TL;DR

Get business pricing on tools and workshop supplies
- Business-only prices and quantity discounts
- Tax-exempt purchasing
- Multiple users, one account, clear invoices
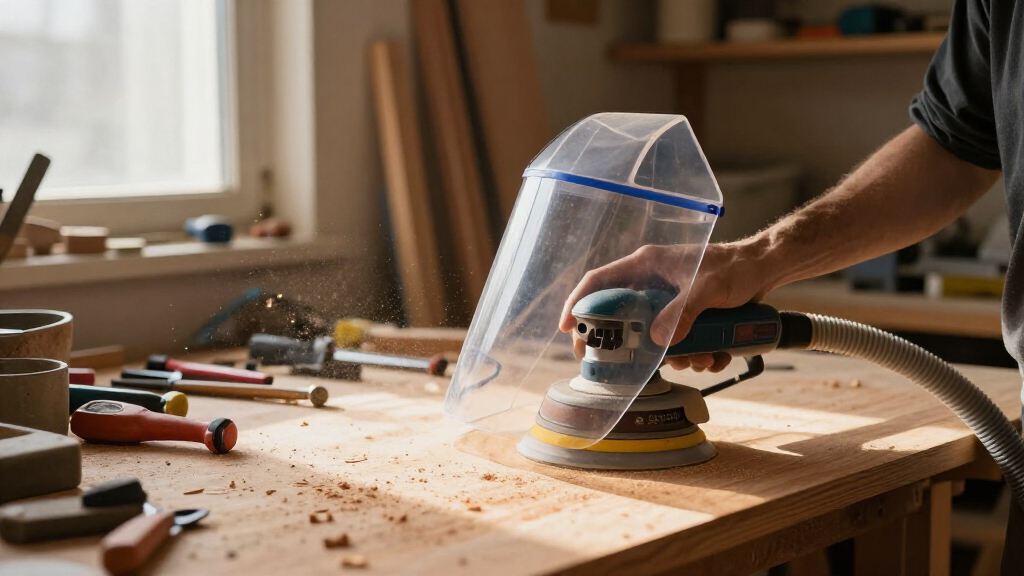
A compact dust hood works by enveloping the sanding zone so your vac’s airflow captures dust at the source, where effectiveness is highest — most handheld sanders need only 100–200 CFM, so a shop vac with a cyclone separator is enough. Build a flared plywood box (45–60° side angles) with a tapered transition to a 2.5″ port, seal every joint, and still wear a respirator because hardwood dust is a known carcinogen.
Sanding generates fine dust under 2.5 microns — particles so small they slip past your nose hairs and settle deep in your lungs. Hardwood dusts like oak and beech are classified carcinogens by the IARC [1]. And yet most garage shops handle sanding dust with a shop vac held hopefully near the workbench. That’s not dust collection. That’s wishful thinking.
Here’s the good news: you can build a compact dust hood that actually captures sanding dust at the source for roughly $15–20 in scrap plywood and a Saturday morning. No welding, no exotic tools, no $400 commercial dust boom. Just a flared box, a hose port, and a little airflow math.
In this guide, I’ll walk you through the design principles, the exact build steps, and how to hook it up to what you already own — plus honest answers on shop vac versus dust collector and whether you still need a respirator. Spoiler: yes.
A compact hood captures dust at the source, where effectiveness is highest — capture velocity drops roughly with the square of distance from the opening.
Most handheld sanders need only 100–200 CFM at the tool, so a shop vac with a short 2.5" hose outperforms a dust collector for this job.
Flare hood sides at 45–60°, taper the transition to the port, and caulk-seal every joint — geometry and leak-proofing matter more than material choice.
Run a cyclone separator and HEPA filter; standard vac bags pass sub-2.5-micron dust — an IARC-classified carcinogen in hardwoods — back into your air.
Keep wearing a N95 or P100 respirator even with a great hood; layered protection is the standard, not paranoia.
Why Your Shop Vac Alone Isn’t Catching the Fine Stuff
Building a compact dust hood for your sander matters because sanders throw dust everywhere — a random orbital sander spinning at 12,000 orbits per minute launches fine dust in a 360° halo before your vac’s hose port can grab half of it. The dust that escapes isn’t the chunky sawdust you sweep up. It’s the invisible fraction under 10 microns, and especially under 2.5 microns, that penetrates deep into your lungs [1]. That dust sits in your shop air for hours.
I learned this the hard way. After an afternoon of hand-sanding a walnut tabletop with only a shop vac nearby, I wiped my glasses the next morning and found a gray film on the lenses that had been in the room overnight. The vac picked up the piles. The air kept the rest.
The physics problem is simple: a vac port on the tool captures dust leaving the pad, but the fine particles that miss the port disperse within inches. A hood fixes this by enveloping the entire sanding zone, so the dust never gets a chance to escape. Capture effectiveness drops sharply with distance from the source — every inch between the dust and your airflow matters.
There’s a tradeoff to be honest about, though: a hood constrains how you move the work. If you sand large, awkward pieces, a fixed hood isn’t a full solution. Pair it with good ventilation and a respirator for the big stuff. For everything that fits on a bench — which is most sanding in a small shop — a hood catches the overwhelming majority of the dust.
The Two Design Rules That Make or Break a Dust Hood
A compact dust hood works on two principles: proximity (get the hood as close to the dust source as possible) and geometry (flare the sides and taper the transition so air keeps moving toward the port). Get these right and a cheap shop vac does the job. Get them wrong and you’ve built a decorative plywood box.
Rule 1: Capture velocity dies with distance
Air moving into a hood opening loses velocity fast — roughly with the square of the distance from the opening. Double the distance between the dust source and the hood face and you’ve cut capture velocity to a quarter. This is why a compact hood enveloping the sander’s exhaust area beats a big ambient air cleaner across the room every time. Design your hood so the sanding action happens inside or inches from the opening, not a foot away.
Rule 2: Taper, don’t bottleneck
Abrupt transitions from a wide hood mouth to a narrow hose port create turbulence and kill static pressure. Flare the hood’s sides at 45–60° and use a tapered transition down to your port. Think of it like a funnel for air — smooth walls guide the flow; square corners choke it.
On airflow: most random orbital and belt sanders need roughly 100–200 CFM at the tool for good capture [1]. A decent shop vac delivers that at short hose lengths. A dust collector moves far more air but at lower static pressure — fine for a big downdraft table, overkill for a compact hood.
Design rule of thumb: keep the hood opening under 4x the area of your hose port. Bigger openings need proportionally more CFM to maintain capture velocity across the face.
One more practical note: make the mouth adjustable. A hinged or sliding front baffle lets you shrink the opening for small work, which concentrates your airflow exactly where it’s needed. Free performance, no extra CFM required.
Materials List: What You Actually Need (and What to Skip)
You can build a compact dust hood from ¼” or ½” plywood, MDF, ABS plastic, or sheet metal — the material matters less than the sealing and geometry. Half-inch plywood is my default for a bench hood: rigid, cheap, easy to screw and glue. Here’s a realistic list for a small garage shop build.
- ½” plywood or MDF — roughly a 2′ x 2′ scrap is enough for a bench-mounted hood
- Clear acrylic or polycarbonate panel — for the viewing window, so you can see the work through the hood
- 2.5″ dust port fitting — match your existing hose; a 3D-printed adapter ring works if your sizes don’t line up
- Screws, wood glue, and silicone caulk — for assembly and sealing every joint
- Weatherstripping or foam tape — to seal the adjustable baffle
- Hose clamps — two, for the port connection
The acrylic-versus-plywood question comes down to visibility versus cost. A 6″ x 8″ polycarbonate window runs $8–12 and is worth it — you’ll position workpieces by sight constantly. Plywood-only hoods work but lead to a lot of peeking around the side. Polycarbonate beats acrylic for impact resistance if you’re clumsy like me; acrylic scratches less but cracks when you drop a wrench on it.
What to skip: expensive anti-static tubing for a 6-foot run (more on static later), and sheet metal unless you already own tin snips and enjoy bleeding. Plywood and caulk get you 95% of the performance for 20% of the effort.
For filtration, budget for a HEPA-rated vac filter if you don’t have one. Standard shop vac bags pass fine dust straight back into the air, which defeats the entire project. A cyclone separator — a $30 Dust Deputy-style cone or a DIY Thein baffle — sits between vac and hood and keeps 95%+ of the chips out of the filter, stretching its life dramatically [1].
Step-by-Step: Build the Hood in One Afternoon
Build a compact dust hood for your sander in seven steps — a bench-mounted inline box roughly 14″ wide, 10″ deep, and 12″ tall at the back, sloping to 8″ at the front. The sander docks into the front; the workpiece sits on the bench inside the hood mouth. Total time: three to four hours including glue cure.
- Cut the sides. Rip two side panels from ½” plywood, 10″ deep, with the back edge 12″ tall sloping to an 8″ front edge. This gives you roughly a 60° flare that guides air toward the port without a dead corner.
- Cut top, bottom, and back. Top is 14″ x 10″, bottom matches, back is 14″ wide and tall enough to close the tall end. Dry-fit everything and check square before gluing.
- Cut the port hole. A 2-5/8″ hole saw makes a press-fit opening for a standard 2.5″ fitting near the top of the back panel — highest point, where warm dust-laden air naturally wants to go. A little low-angle filing turns the press fit into a snug one.
- Glue, screw, and seal. Assemble with glue and screws, then run a bead of silicone caulk along every interior joint. Unsealed joints leak air, and leaked air is stolen CFM. Let the caulk cure overnight.
- Add the viewing window. Rout or saw a 6″ x 8″ opening in the top panel, leaving a ¾” lip all around, and screw the polycarbonate over it. Drill the plastic’s screw holes oversize so it doesn’t crack.
- Build the adjustable baffle. A sliding plywood front panel in side grooves lets you shrink the mouth from 8″ down to 2″ for small pieces. Stick foam tape where the baffle meets the sides.
- Mount and connect. Screw the hood to your bench through the bottom panel, attach the hose with clamps, and fire up the vac.
Tolerances here are forgiving — this is a box, not a drawer. The two places to be precise are the port hole fit (leaks here hurt most because they’re closest to the suction) and the baffle grooves, which should slide smoothly without slop. A 1/32″ of play is fine; an 1/8″ rattles.
If you own a 3D printer, print adapter rings for odd-sized ports and hose couplings. It’s the single best use of a printer in a dust collection project, and it saves a lot of duct tape.
Hooking It Up: Shop Vac vs. Dust Collector, Settled
For a compact sander hood, a shop vac — not a dust collector — is the right machine. Here’s why: sanders need high static pressure to pull air through small tool ports, and vacs deliver that. Dust collectors move huge volume at low suction, which suits wide-open machines like planers, not 2.5″ hoses. Match the machine to the job.
| Factor | Shop Vac | Dust Collector |
|---|---|---|
| Airflow at tool | 100–200 CFM | 400–1,100+ CFM |
| Static pressure | High (50–90″ water lift) | Low (8–12″) |
| Best for | Handheld sanders, compact hoods | Downdraft tables, stationary machines |
| Hose size | 1.25″–2.5″ | 4″ |
| Filter concern | Fine dust bypass (needs HEPA) | Needs fine filter cartridge |
Whatever you use, keep the hose run short. Long, small-diameter hoses kill suction — every foot and every bend costs you static pressure. Keep the vac under the bench with 6 feet of 2.5″ hose maximum, and step up from 1.25″ tool hose to 2.5″ wherever you can. The difference is immediately audible in vac pitch.
Put a cyclone separator in the line. Without one, your filter loads up with fine dust in a few sessions, suction drops, and capture falls off a cliff. With one, the heavy waste drops into a bucket and the filter mostly stays clean. A DIY Thein baffle built into a 5-gallon bucket costs about $15 in parts [1].
On static electricity: plastic hose and fittings do build charge, and you’ll feel the occasional snap. Some builders run a grounding wire along the hose; the actual fire risk in a small home system is debated and generally considered low [1]. Grounding is cheap peace of mind if it worries you — just don’t let it become a procrastination project.
Test It Before You Trust It (and Yes, Keep the Respirator)
Test your hood with a simple smoke or dust test before you trust your lungs to it: run the vac, sprinkle a pinch of sawdust near the hood mouth, and watch the airflow pull it in. Dust that drifts away instead of getting captured tells you exactly where your leaks and dead spots are.
Here’s my go-to verification: sand a scrap of dark walnut inside the hood for two minutes, then run a fingertip along the bench in front of the opening. Pre-hood, I’d get a gray stripe every time. Post-hood with the baffle snugged down, the bench stays clean. Some hobbyists now take it further with cheap particle counters to measure actual capture rates [1] — overkill for most of us, but genuinely useful if you’re dialing in a design.
Common fixes for poor capture:
- Dust escapes the mouth — shrink the opening with the baffle; you’re asking too few CFM to cover too much area
- Weak suction at the hood — check for caulk-blocking leaks, kinked hose, or a loaded filter; add or clean the cyclone
- Dust settles inside the hood — your port is too low or the flare is too shallow; air is stalling instead of sweeping through
And the honest answer on respirators: yes, wear one anyway. A 95%-effective hood still passes 5%, and 5% of carcinogenic hardwood dust [1] is not zero. A NIOSH N95 at minimum; a half-mask with P100 cartridges if you sand regularly. Think of the hood as engineering the hazard down and the respirator as your last line — that’s how the pros layer protection, and it works in a garage too.
Wear hearing and eye protection while sanding, keep loose sleeves away from the pad, and if your build ever involves wiring a fan or modifying a vac’s motor, leave that to a licensed electrician. Unplug everything before you stick your hands near a port to clear a clog. Five seconds of caution beats a trip to the ER.
Three Hood Styles for Three Kinds of Sanding
The inline bench hood above is one of three proven designs, and the right one depends on what you sand most. Pick the style before you cut wood — retrofitting a hood to the wrong workflow is frustrating.
1. Inline docking hood (the build above). The sander works through the opening on pieces held at the bench. Best for small parts, edge work, and finishing prep. Smallest footprint, best capture per CFM because the opening is small.
2. Downdraft table. A perforated top with a plenum underneath, pulling air down through the workpiece. This is where a dust collector shines — you need 350+ CFM to get meaningful downward velocity across a 2′ x 2′ perforated surface. Great for flat panels and anything you sand flat. Build the top from pegboard or drilled ½” plywood on a 2×4 frame.
3. Boom-arm or overhead hood. A suspended hood positioned over stationary sanding — think spindle sander or a bench area. Most flexible, least compact, and the hardest to get good capture from because the open sides let air wander. Wall-mounted sanding stations with built-in hoods, popularized by woodworking YouTubers, are essentially a refined hybrid of styles 1 and 3.
My recommendation for a first build in a small shop: go inline. It’s the cheapest, the most forgiving of modest CFM, and it teaches you the capture principles you’ll use in every later build. Add a downdraft table when you find yourself sanding more tabletops than box lids.
Frequently Asked Questions
Will a dust hood work with a random orbital sander, or only stationary sanders?
Both, but differently. A random orbital sander already has a dust port — pair it with a vac hose, then use the hood as a second layer that catches what the tool port misses. For stationary sanders like a spindle sander or a mounted belt sander, the hood does the primary collection. The inline bench hood design works well for handheld sanders because you bring the sander to a controlled, enclosed zone.
What CFM does my sander actually need for good capture?
Plan on 100–200 CFM at the tool for random orbital and belt sanders. Most shop vacs deliver this through a short 2.5″ hose. If your suction feels weak, the usual culprits are a loaded filter, a kinked or over-long hose, or leaks at the port — not insufficient vac capacity.
How do I connect the hood to my existing 2.5″ dust collection system?
Cut a 2-5/8″ hole for a standard 2.5″ fitting and secure it with a hose clamp plus a caulk bead around the flange. If your system uses blast gates, dedicate one to the hood. Keep the branch run as short and straight as possible — remember that dust collectors provide volume but low static pressure, so a compact hood actually performs better on a vac unless you’ve scaled the opening way up.
Is a cyclone separator worth it for a small shop?
Yes — it’s the highest-value accessory in the whole setup. A $30 cone or a DIY Thein baffle keeps the vast majority of chips and dust out of your filter, which maintains suction session after session. Without one, fine dust loads the filter quickly, airflow drops, and your carefully built hood stops capturing. It also makes emptying the vac a far less dusty chore.
Do I still need to wear a respirator if I have a good dust hood?
Yes. Even a 95%-effective hood passes some dust, and hardwood dusts like oak and beech are IARC-classified carcinogens — there is no safe bonus exposure. Wear at minimum a NIOSH N95, or a half-mask with P100 cartridges if you sand weekly. The hood reduces the hazard; the respirator is your backup. Layer both, the way professionals do.
Conclusion
Build the hood, seal it, shrink the mouth, and let physics do the work — a $20 plywood box positioned two inches from the dust beats a $400 filter trying to clean a whole room. That’s the whole game: capture at the source, every time.
Your lungs are the only pair you get, and they’ve been quietly cataloguing every sanding session you’ve ever run. Give them the weekend. Cut the plywood tonight, and the next time you sand a piece of oak, the only evidence will be the workpiece — smooth, clean, and sitting in a shop you can still see across.
Fall yard work Picks
leaf blowers
As an affiliate, we earn on qualifying purchases.