
TL;DR

Get business pricing on tools and workshop supplies
- Business-only prices and quantity discounts
- Tax-exempt purchasing
- Multiple users, one account, clear invoices
Under-bench storage frees floor and wall space when you match each storage type to the tools you keep, measure the bench and access clearances, and respect load limits. Start with frequently used items, keep heavy loads low, protect dust-sensitive supplies in lidded containers, and leave enough legroom and access to equipment.
A small workshop can feel crowded even when every wall has a hook and every machine has a home. The floor beneath your bench is often the overlooked patch that can free up valuable space—as long as you can still sit, reach a clamp, and sweep the dust out from under it.
This guide shows you how to plan under-bench storage around the work you actually do. You’ll learn what to measure, how to choose drawers, shelves, cabinets, or a rolling cart, and how to keep weight, dust, and legroom from turning a tidy bench into an awkward one.
Think of the space as a compact tool station, not a place to hide whatever doesn’t fit elsewhere. A few deliberate choices can make keeping frequently used tools close feel effortless—and make the rest of your shop feel larger.
Inventory tools by task and frequency before deciding what the bench should hold.
Measure the opening and account for braces, drawer travel, door swing, casters, and legroom.
Use shallow drawers for small frequently used tools, shelves for bins and cases, and cabinets or lidded containers for more dust protection.
Keep heavy storage low, check the ratings of the bench and hardware, and secure units that could tip.
Label categories and choose modular inserts so the layout can change with your projects.
Small Workshop Field Guide / Storage 01
Maximizing Use of Under-Bench Storage in Small Workshops
Turn overlooked space into a compact tool station. Match storage to your work, measure the real clearances, and keep useful tools close without sacrificing legroom or safe access.
“Treat the space as a tool station, not a home for leftover clutter.”
Core idea / 0101 / Start with the work
Give prime space to tools you actually use
Inventory first. Daily-use items deserve the easiest access; occasional kits can sit in labeled bins, while rare and bulky supplies can live elsewhere.
Shallow and visible
Keep small hand tools and frequent consumables in an easy-to-reach drawer. Dividers stop tiny parts from disappearing.
Task-specific kits
Group related supplies in labeled bins, such as a sharpening kit or a cabinet assembly set.
Bulky and backup stock
Move seasonal supplies, duplicates, and project leftovers to deeper storage if the bench area is tight.
02 / Measure the real opening
Plan for the bench—and your body
A box may fit between the legs on paper yet collide with a brace, catch your knees, or block access when opened.
Measure inside the legs at several points; note braces and existing drawers.
Check floor-to-apron height and preserve room for feet, stools, or rolling equipment.
Measure from the front edge, including knee space and workpiece support.
Allow for drawer travel, door swing, casters, stools, and nearby machines.
Clearance sketch / not to scale
Tape the proposed footprint on the floor and mock up the front with cardboard. Sit or stand as you normally work before building.
Keep exits, electrical panels, ventilation, machinery, and comfortable legroom clear. Write down measurements and recheck before cutting.
03 / Match format to contents
Choose storage for access, protection, and load
A mix often works better than one deep cabinet. Keep heavy items low, check hardware ratings, and secure units that could tip.
| Storage type | Best fit | Check before choosing |
|---|---|---|
| Shallow drawers | ✓ Small tools and parts | Slide rating, drawer travel, total added load |
| Shelves | ✓ Bins, cases, larger supplies | Dust exposure, reach, and heavy loads |
| Cabinets | ✓ Enclosed supplies and visual order | Door swing, anchoring, available legroom |
| Rolling carts | ✓ Tools shared across work areas | Locking casters and a clear travel path |
04 / A build order you can verify
Five checks from empty space to useful storage
Follow the sequence to catch fit and access issues before investing in cabinetry, then adjust after real projects.
Measure
Record clear width, height, depth, obstructions, and floor clearance.
Sort
Group contents by task and frequency; remove items that belong elsewhere.
Choose
Select drawers, shelves, cabinets, a cart, or a practical mix.
Verify
Check structure, fasteners, slides, casters, load, and moving clearances.
Label
Use clear categories and modular inserts that can change with projects.
05 / Keep it usable over time
A tidy bench should still feel like a bench
Storage earns its place when it shortens a task and leaves the shop comfortable, safe, and easy to clean.
Protect what needs protecting
Fine dust reaches open shelves. Use lidded containers for dust-sensitive supplies, clean beneath the bench regularly, and keep glue or other sensitive materials away from direct heat. For a small garage shop, two shallow drawers for screwdrivers and measuring tools, a low shelf for a lidded router-bit box, and a closed cabinet for glue can serve different needs without crowding one deep cabinet.
Before you call it done
- Heavy items sit low and the bench and hardware are rated for the load.
- Drawers and doors open fully without hitting knees, stools, or machines.
- Exits, panels, ventilation, and equipment remain accessible.
- Bins are labeled; dividers and inserts can move as projects change.
- A clear path remains for sweeping dust and rolling equipment.
Start with the tools you reach for every week
Maximizing use of under-bench storage starts with deciding what belongs there: the tools and supplies you use often, fit safely, and can reach without disrupting your work. Group items by task and frequency before you build or buy anything; daily-use items deserve the easiest access, while seasonal supplies can sit deeper or higher.
Take a real inventory, not a wish list. If you spend Saturday tuning hand planes, your bench might need a shallow drawer for a marking gauge, pencils, and feeler gauges, plus a lidded bin for sharpening stones. If you mostly assemble cabinets, a shelf for glue bottles and a rolling tote for clamps may earn more space than a drawer full of specialty bits.
Try this quick sorting pass: put the contents you’re considering on the floor, then divide them into daily, occasional, and rarely used groups. Look for duplicates and project leftovers while everything is visible. A handful of loose screws that have lived in a coffee tin for three years probably don’t need prime real estate under your bench.
- Daily: keep small hand tools or frequently used consumables in a shallow, easy-to-reach drawer.
- Occasional: store task-specific kits together in labeled bins.
- Rare: move seasonal, bulky, or backup supplies to deeper storage elsewhere if the bench area is tight.
This inventory helps you avoid filling every gap just because it’s there. In a small workshop, organized storage is useful when it shortens a task, not when it gives forgotten clutter a new address.
Popular right now

Vitamix Propel Series 750 Professional-Grade Blender, 4 Programs, Black

Vitamix Propel Series 510 Professional-Grade Blender, 3 Programs, Black

Ninja Foodi 10-Qt DualZone Smart XL Air Fryer, 6-in-1, DZ550
As an affiliate, we earn on qualifying purchases.
Measure the bench and the space your body needs
To plan under-bench storage, measure the clear width, height, and depth, then check every obstruction and moving part that could limit access. A storage box that fits between the legs on paper can still collide with a stretcher, catch your knees, or block a drawer when you pull it open.
Measure inside the legs at several points, because benches aren’t always perfectly square and braces can narrow the space. Note the floor-to-apron height, depth from the front edge, brace positions, and any existing drawers. Then mark how far a drawer extends and how much room a cabinet door needs to swing; include the path of nearby rolling machines and shop stools.
Here’s a useful test: tape the proposed storage footprint on the floor, and use cardboard to mock up the front face. Sit or stand at the bench as you normally would. If the mock-up presses against your shins while you plane a board, you’ve found the problem before a sheet of plywood and a set of slides make it permanent.
Preserve comfortable legroom and access to exits, electrical panels, ventilation, and machinery. Those clearances are part of the layout, not spare space to fill. In a 24-inch-deep bench, a 20-inch-deep cabinet may leave too little room for feet or for a workpiece to rest across the front edge.
Write down the measurements and recheck them before cutting. Account for the full travel of drawers and doors, plus casters if a unit needs to roll. Those few minutes of measuring protect both your workflow and the accuracy of the build.
Choose drawers, shelves, or cabinets for what you store
Choose storage by matching the container to the contents: drawers for small tools and parts, shelves for bins and larger items, and cabinets for supplies that benefit from a door. Each option trades quick access against protection, capacity, and the space it occupies.
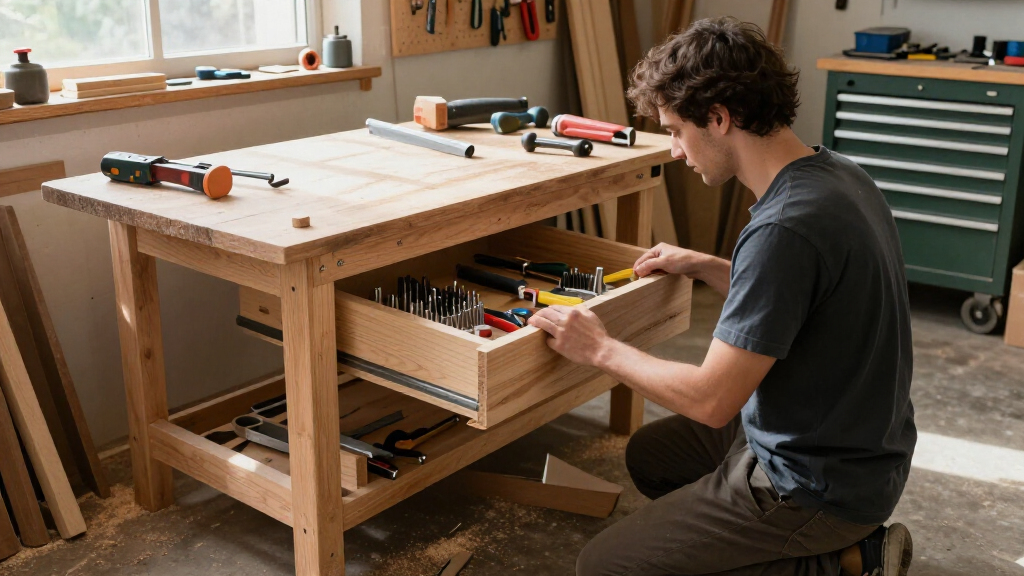
Drawers work well for layout tools, drill bits, and hardware because you can see and sort small items at bench height. Shallow drawers reduce buried layers; dividers keep a 1/8-inch hex key from vanishing under a pile of router bearings. Check the slide rating and account for the drawer, hardware, and contents together. A sturdy-looking bench doesn’t automatically mean its apron or fasteners can handle a heavy bank of drawers.
Shelves are straightforward and flexible. They suit cases, bins, and stock that doesn’t need to be inspected every hour. Put the heaviest material low, and use labeled bins so a stack of sanding discs doesn’t become a mystery pile. Cabinets contain visual clutter and offer more protection from airborne dust, but ordinary doors and joints aren’t airtight; lidded containers provide an extra barrier for delicate items.
| Storage type | Best fit | Watch for |
|---|---|---|
| Shallow drawers | Hand tools, small parts, layout gear | Slide capacity, drawer travel, added load |
| Shelves | Bins, cases, larger supplies | Dust exposure, reaching past items, heavy loads |
| Cabinets | Clutter control and enclosed supplies | Door swing, anchoring, limited legroom |
| Rolling carts | Tools shared between work areas | Locked casters and clear travel path |
For example, a small garage shop might put screwdrivers and measuring tools in two shallow drawers, store a lidded box of router bits on a low shelf, and keep glue in a closed cabinet away from dust and direct heat. That mix often beats building one deep cabinet that swallows everything.
Build in a simple order you can check as you go
A reliable under-bench setup follows five checks: measure, sort, choose, verify, and label. Working in that order catches fit and access problems before you invest time in cabinetry, while leaving room to adjust after you use the storage for real projects.
- Measure the opening. Record clear width, height, and depth, including legs, braces, apron, and floor clearance.
- Sort the contents. Group by task and how often you reach for each item; remove items that belong somewhere else.
- Choose a storage type. Pick drawers, shelves, cabinets, a cart, or a mix based on size, access, mobility, and dust exposure.
- Check the load and movement. Confirm the bench, fasteners, slides, and casters can support the planned weight. Test drawer extension, door swing, legroom, and access to machines.
- Label and review. Put each category in a defined home, then adjust the layout after a few work sessions.
Say you’re fitting out a bench for furniture repairs. You measure a 36-inch opening, but a center stretcher splits it into two bays. Instead of designing one wide drawer that cannot fit, you put small-part drawers in the left bay and a removable case for chisels on the right. The second bay stays accessible when you need to pull the case out and work away from the bench.
This sequence is useful for a new build and for adapting an existing bench. If you’re adding storage to a bench with a light frame, inspect its joints and supports before hanging heavy drawers from the apron. Storage loads travel into the bench structure, and the hardware rating alone cannot tell you whether the whole assembly is sound.
Keep the plan modular when your work changes. A removable organizer or adjustable shelf costs little to reposition compared with a fixed cabinet that no longer suits your tool collection.
Keep weight low, dust out, and access clear
Safe under-bench storage keeps heavy items low, unstable units secured, and required access unobstructed. Distribute weight across supports instead of assuming the workbench can carry any load just because its top feels solid.
Put benchtop machines, dense hardware, and heavy cases on a lower shelf where they are less likely to tip or strain a drawer slide. Follow the stated limits for slides, shelves, casters, and storage units; also consider the bench joints and the fasteners attaching the unit. If a cabinet is tall or top-heavy, anchor it against tipping. A rolling cart should have locking casters that hold it still during use.
Dust changes what should live in open storage. A sander’s fine powder works into open bins and tool cases; a cabinet door helps, but it doesn’t make a cabinet airtight. Keep dust-sensitive items in lidded containers, clean the area regularly, and separate damp materials from metal tools. Storage won’t stop rust if moisture and condensation remain in the shop.
Picture rolling a heavy case of router bits out from under the bench while a table saw is parked nearby. If the route crosses a power cord, blocks an exit, or pins the saw’s controls, the convenient spot has become a hazard. Keep exits, electrical panels, ventilation, and access to machinery clear, and avoid placing hazardous materials or sharp tools where they can fall or be reached carelessly.
Leave the access path clear. A storage plan is only useful if you can still move safely around the bench and reach the equipment you need.
For a typical home garage, a modest lower shelf with lidded bins often handles heavy or dusty supplies better than overloading a set of full-extension drawers. The right answer depends on the bench and rated hardware, so check those specifications before adding weight.
Make labels and modular bins save you time
Labels and simple dividers make under-bench storage work because they show you where an item belongs and let you spot a missing item quickly. Clear categories beat clever systems: name a drawer “layout tools” or “M5 hardware,” and you won’t need to remember which corner holds the thing you need.
Use drawer dividers for hand tools that move around during opening, and compartmented boxes for screws, washers, and small fittings. Lidded containers work well for project kits: a hinge template, matching screws, and a driver bit can stay together until the next cabinet repair. If you prefer opaque bins, put a large label on the front rather than relying on color alone.
Imagine you’re repairing a chair and need a pair of clamps, a square, and four matching screws. A labeled project bin and a marked clamp shelf turn a series of searches into one pull. That also reduces duplicate purchases: when the remaining screws are visible, you’re less likely to buy another box you already own.
Modular storage helps when the shop changes. Stackable bins, adjustable shelves, and removable inserts let you rework the layout as a new tool or project takes over a bay. Broadly, workshop storage has moved toward configurable organizers and mobile units, but don’t assume a product fits your bench or meets your load needs based on a photo. Check current dimensions, capacity, and compatibility before buying.
Use bench storage in a way that supports your workflow, then review it after a few jobs. If you keep moving the same tool to the top of a shelf, it may deserve a drawer. If a bin never moves, it can go deeper—or leave the bench area altogether.
Let the bench support work instead of becoming a closet
The best under-bench plan combines storage with the rest of your shop: use the bench for frequently needed items and send bulky or rarely used supplies to wall, vertical, or mobile storage. That division helps free up valuable floor space without asking one bench to hold every tool in the garage.
Wall space may suit long clamps or frequently used hand tools, while a separate cabinet can keep finishing supplies together. Under the bench, you can reserve the easy-access portion for layout tools and current project hardware. This arrangement works especially well in a small workshop while preserving a clear path between the bench, saw, and assembly area.
For example, if you build small boxes at a 48-inch bench, you might keep a marking gauge and frequently used drill bits in a top drawer, sanding supplies in a lidded bin on a shelf, and clamps on a wall rack. You gain room below the bench without turning it into a wall of drawers that blocks your knees and hides the floor.
There is no universal drawer depth or shelf layout. The bench’s height, leg spacing, brace design, the work you do, and your body’s comfortable reach all matter. A storage solution that feels perfect for standing assembly may be frustrating if you sit to carve or hand-plane.
Treat the layout as a working arrangement, not a finished monument. If a cart needs to roll between the bench and a drill press, keep its casters locked during work and its travel path clear when parked. If the bench supports a vise or heavy clamping, don’t let an add-on cabinet interfere with the legs or apron that carry those forces.
Frequently Asked Questions
How do I choose between drawers, shelves, and cabinets?
Use drawers for small tools and parts you reach for often, shelves for larger bins and cases, and cabinets when a door helps contain clutter or dust. Check drawer capacity and extension, shelf support, cabinet door swing, and the legroom each option leaves.
How do I measure under my workbench correctly?
Measure the clear width, height, and depth between the bench’s legs, then note braces, the apron, existing drawers, and floor clearance. Include full drawer travel, door swing, caster height, and the space your feet or stool need while you work.
Can I add storage to an existing workbench?
Often, yes, if the bench structure and attachment points can carry the added load. Check the bench joints, fasteners, shelf or slide ratings, and how the unit affects legroom and access before storing heavy materials.
How much weight can under-bench storage hold?
There is no single safe weight for all benches. Capacity depends on the bench, supports, fasteners, slides, shelves, and casters; follow their ratings and distribute loads rather than relying on how sturdy the top feels.
How can I protect tools from workshop dust and moisture?
Use cabinets for a first layer of protection and lidded containers for dust-sensitive tools and parts. Clean storage regularly, keep damp materials separate from metal tools, and manage workshop ventilation because a cabinet won’t prevent rust or condensation by itself.
What should I keep under the bench?
Keep appropriately sized supplies you use often, such as layout tools, small hardware, or a lidded project kit. Store heavy items low, and handle sharp tools and hazardous materials according to their storage and handling instructions.
Conclusion
Give each under-bench space a job: keep your everyday tools close, put heavy supplies low, and protect dust-sensitive items in lidded storage. Measure the bench and your working clearance before you build, and check that the load suits the bench, slides, shelves, or casters carrying it.
Then use the setup for a few projects and move what feels awkward. A good small-shop bench doesn’t just hide clutter; it gives your hands the right tool before the sawdust settles.