
TL;DR

Get tools and workshop supplies delivered free — and shop member deals
- Fast, free delivery on millions of items
- Access to Prime Big Deal Days deals on October 6–7
- Prime Video, Amazon Music and more included
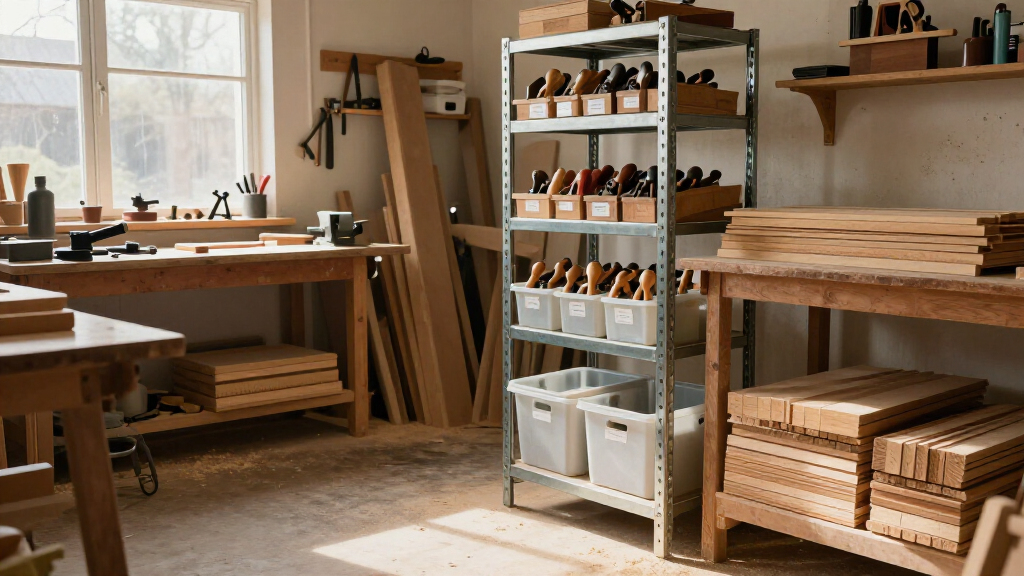
Vertical shelving units free workshop floor space by storing tools and supplies along the wall, but a safe, useful layout starts with measuring the room and checking shelf capacity. Keep heavy items low, anchor tall units as directed by the manufacturer, and reserve high shelves for light, infrequently used supplies. Labels and consistent grouping make every shelf easier to use.
Measure the wall, door swings, machine paths, and stored items before selecting shelf dimensions.
Read whether a capacity rating applies per shelf or to the whole unit, and stay within the manufacturer’s instructions.
Store heavy and awkward objects low; reserve upper shelves for light, seldom-used supplies.
Use labeled bins and consistent grouping so everyday tools remain visible and quick to retrieve.
Follow anchoring guidance, protect access to exits and utilities, and check shelving as your shop changes.
Optimizing Your Workshop Storage with Vertical Shelving Units
Give the floor back to your work. Measure the wall, match shelves to their loads, and arrange tools so the things you use every day stay visible and within reach.
Measure the wall and the working space
A unit can fit the wall and still block the work. Plan the route, the reach, and the objects that need to move before choosing dimensions.
Map what is fixed
Record ceiling height and usable wall width. Mark doors and their swings, windows, outlets, switches, benches, and machine paths.
Measure what you own
Check the tallest toolbox, longest clamps, and depth of cases. Shelf dimensions need to suit the items, not just the wall.
Protect movement
Leave room to open doors, pull out bins, carry bulky stock, and reach exits and electrical panels. Keep paths clear around machines.
Match the shelf to the load and the room
Material is one part of the decision. Support spacing, product design, installation, and workshop conditions matter just as much.
Steel
Consider it for heavy tool cases and equipment. Check stated capacity, assembly, finish, and corrosion resistance in damp spaces.
Wood
Useful for lighter supplies or custom shelving. Check panel support, fastening, moisture exposure, and the product’s rated load.
Composite
Can work for lightweight storage. Review panel construction, rated capacity, and whether the environment suits the material.
| Construction | Often suits | Check before buying |
|---|---|---|
| Steel | Heavy tools and equipment | Load rating, finish, corrosion resistance, assembly |
| Wood | Light supplies or custom shelving | Panel support, moisture exposure, fastening |
| Composite | Lightweight storage bins | Rated load, panel construction, environment |
Ratings may apply to each shelf or to the complete unit. Check the manufacturer’s product details and installation instructions.
Build stability from the floor up
Evenly distributed loads, a low center of weight, and proper anchoring help keep a tall rack stable as the shop gets busy.
Read the rating closely
Confirm whether the limit applies per shelf or to the whole unit. Follow the specified assembly and loading conditions; never treat the maximum as a target.
Place dense items low
Put a cast iron vise or benchtop sander on a suitably rated lower shelf. Center loads and spread weight as the instructions specify.
Anchor as directed
Follow manufacturer guidance, especially for tall, narrow, or heavily loaded units. Use the specified fasteners and a suitable attachment point.
Check the setup
Use a stable, level location. If the rack or its contents feel unstable, stop loading and correct the setup before storing more equipment.
Make every shelf easy to use
Storage works when you can find and retrieve an item without shifting a stack of boxes. Keep everyday tools in the comfortable reach zone.
Group by task
Collect measuring, sanding, and finishing supplies together.
Set the reach zone
Put frequently used tools where you can reach them comfortably.
Load from below
Place heavy and awkward objects on suitable lower shelves.
Label containers
Use clear bins and consistent labels for small parts and supplies.
Use the top lightly
Reserve higher shelves for light, seldom-used items you can retrieve safely.
Leave room for the next project
A workshop changes. Adjustable shelves, modular units, bins, hooks, and drawers can make a storage wall easier to reorganize as tools and projects change.
Protect materials
Account for dust, moisture, temperature changes, and chemical exposure. Keep shelves clear of heat sources and follow product labels for hazardous materials.
Keep flexibility
Adjustable or modular systems can adapt to new tools and projects. Reserve some wall width instead of filling every inch on day one.
Reach high items safely
Use a stable step stool or ladder for upper shelves. Keep objects from sliding or falling into a work area.
Measure the wall and the working space before you choose a unit
Optimizing your workshop storage with vertical shelving units starts with measuring the wall, the things you plan to store, and the room each item needs to move safely. Measure ceiling height and usable wall width, then mark door swings, windows, outlets, switches, benches, and machine paths. Those measurements show the difference between storage that fits the wall and storage that fits the work. A shelf can fit on paper and still block the garage door or put a sharp plane right where you reach for a clamp. For example, imagine a one-car garage with a table saw near the center and a 72-inch stretch of wall beside the entry door. A shelving unit that fits that span may still make the door awkward to open, so check the full swing and keep a walking lane to the exit. Losing a few inches of shelf width can be a useful trade if it keeps the route clear when you carry a long board or move around operating equipment. Measure your tallest toolbox and longest clamps, too; the outside dimensions of the unit don’t tell you whether the shelves can hold the objects you own. Sketch the wall and note shelf depth as well as width and height. A deep shelf may take more floor space than you can spare and narrow the route through the shop, while a shallow one may leave a drill case hanging over the edge. Leave working clearance for pulling out bins and carrying bulky stock. If you expect your setup to change, reserve some wall width for future needs instead of filling every inch on day one; a little unused space can be more valuable than having to rearrange a crowded wall each time a new tool arrives.heavy duty vertical shelving units for workshop
As an affiliate, we earn on qualifying purchases.
As an affiliate, we earn on qualifying purchases.
Choose steel, wood, or composite shelves for the loads you own
Steel, wood, and composite shelves suit different workshop loads, environments, and budgets, so choose by what you plan to store rather than by appearance or a large capacity number. Compare the manufacturer’s rating for each shelf or for the whole unit, and check the assembly and installation instructions before loading it. Capacity depends on the specified setup; an attractive rack cannot make an overloaded shelf safe. Material affects durability and upkeep, but the design, support spacing, and installation matter just as much. A steel unit often makes sense for heavy tool cases, benchtop equipment, or dense hardware when its stated capacity fits the job. Its rigidity can help support concentrated weight, but a metal finish that corrodes in a damp garage may require more attention over time. Wood or composite shelving can work well for lighter supplies and may be easier to adapt to an unusual wall or bin size. That flexibility comes with checks of its own: moisture, panel support, and repeated knocks can weaken or damage some products. Check product details rather than assuming all materials of one type perform alike.| Construction | Often suits | Check before you buy |
|---|---|---|
| Steel | Heavy tools and equipment | Load rating, finish, corrosion resistance, and assembly |
| Wood | Light supplies or custom shelving | Panel support, moisture exposure, and fastening |
| Composite | Lightweight storage bins | Rated load, panel construction, and environment |
As an affiliate, we earn on qualifying purchases.
Load shelves from the floor up to keep the rack steady
A stable vertical shelving unit carries its heaviest items low, spreads loads as directed, and stays within the manufacturer’s rating. Treat capacity as a ceiling rather than a target: the shelf, assembled rack, supporting floor or wall, and required fasteners all need to suit the load. Ratings may refer to an individual shelf or the full unit, so read the label and instructions carefully. An overloaded shelf can bend or fail, while a top-heavy rack is more likely to tip if bumped; observing both limits protects the unit and the people working nearby. Suppose your shop stores a cast iron vise, a benchtop sander, and light sanding blocks. Put the dense vise and sander on lower shelves where lifting strain is lower, then keep the blocks above. Center each load and distribute weight as the instructions specify instead of piling it at one corner. This reduces concentrated stress on a shelf and keeps the rack’s center of weight low. A tall, narrow rack loaded heavily near the top can become easier to tip, especially if the floor is uneven or the unit is poorly assembled. Follow the manufacturer’s anchoring instructions, particularly for tall, narrow, or heavily loaded units. Anchors help resist tipping, but only when the specified fasteners meet a suitable attachment point; a fastener that only catches drywall may not provide the support the installation calls for. Check the floor before assembly and avoid putting a rack where a bumped corner can roll or snag a cable. If a unit or its contents feel unstable, stop loading it and correct the setup before storing more equipment.As an affiliate, we earn on qualifying purchases.
Put everyday tools within reach and save the top shelves for light items
The best vertical shelving layout keeps frequently used supplies at comfortable reach and puts lightweight, seldom-used items higher up. Store awkward or heavy objects low, and make sure nothing can slide or fall into your work area. The goal is quick access: adding height helps only when you can find and retrieve what you need without shifting three boxes first. Placing daily tools within reach also reduces repeated bending and stretching; storing rarely used items higher makes use of space that would otherwise be harder to access. Here’s a simple sequence for setting up a new rack:- Group items by task, such as measuring, sanding, or finishing. Keeping related supplies together cuts down on trips across the shop.
- Place the tools and supplies you use most often at reachable heights, where you can take them out and put them back without moving other items.
- Keep heavy or awkward items on the lower shelves and distribute them evenly, so lifting is easier and the rack remains balanced.
- Put light, infrequently used items on high shelves, leaving room to lift them down safely. A tightly packed top shelf can make a light box difficult to retrieve without knocking into its neighbors.
- Label bins and shelves so a tool has a predictable home after each project. Clear homes make it easier to spot when something is missing or has been returned to the wrong place.
labeled storage bins for workshop tools
As an affiliate, we earn on qualifying purchases.
As an affiliate, we earn on qualifying purchases.
Make small parts easy to find without turning shelves into piles
Labels, bins, and consistent grouping make vertical storage useful because they help you return tools and supplies to the same place. Extra shelf space alone does not solve a clutter problem; without clear homes, loose hardware tends to spread into mixed piles. Keeping small pieces contained also prevents them from falling behind a shelf or mixing with dust. Group them by type or project so you can find a hinge screw without opening every box. Picture a shelf with three unmarked tubs of screws. After one cabinet build, you might spend more time sorting them than driving them. A set of labeled containers for screws, bolts, and plugs turns that shelf into a parts station instead. Labels save time when you return items, too, because you do not need to remember where a particular fastener ended up. If you work on several projects at once, project bins can keep each job’s hardware and instructions together; return shared tools to their regular homes when you finish so a temporary project setup does not become permanent clutter. Adjustable shelves and modular units can make it easier to change the layout as your tools or projects change. Adjustable spacing is useful when a taller case replaces several short bins, while add-on bins, hooks, or drawers can keep small items from taking up a full shelf. Each feature has a cost in money and space, so choose only those that solve a recurring problem. Current product designs commonly include faster assembly systems, adjustable levels, add-on bins, hooks, and drawers, but those features add value only when they fit your routine. In a garage shop, a simple rack with a few sturdy bins may beat a more elaborate storage wall that costs more and takes longer to reconfigure. Leave some room for future equipment rather than packing every shelf tight from the start.Fit shelving around dust, moisture, utilities, and safe access
Workshop shelving needs to suit the conditions around it: sawdust, moisture, temperature changes, chemical products, heat sources, and access to exits or electrical panels. These conditions affect both the shelves and what you store on them. A layout that looks tidy can create new problems if it blocks a utility, puts finishes beside a heater, or lets dust collect around items that need clean storage. Read labels on stored products and follow local guidance for hazardous materials. For example, a shelf beside a table saw may collect a fine film of dust on every open container. Lidded bins can protect small hardware, while frequently used tools should stay accessible enough that you won’t leave them perched on a machine. The tradeoff is that closed bins take an extra step to open, so reserve them for items that benefit from dust protection and keep everyday tools easy to retrieve. If the garage gets damp, check for corrosion on metal parts and moisture damage on wood or composite panels. Keep shelving clear of heat sources and do not use it to block an electrical panel or an exit, where storage could delay access when it matters. Tall storage also changes how you work overhead. Use a stable step stool or ladder, keep the top shelves light, and avoid storing objects where they could fall onto a bench or machine. If installation involves electrical, gas, structural, or roof work, hire a licensed professional and follow the relevant safety steps, including shutting off power where applicable and wearing suitable PPE. Do not drill or fasten into concealed services or structural members based on guesswork; check the appropriate plans and requirements first.Keep the storage working as your shop and projects change
A vertical storage system stays useful when you review it as your projects, tools, and supplies change. Adjustable shelves let you change spacing for taller cases or shorter bins; modular units can make expansion or rearrangement easier. Those features trade some simplicity for flexibility: a fixed rack may be cheaper and straightforward when your storage needs are stable, while an adjustable system can save replacement costs as they shift. Before adding another shelf or heavier tool, check the unit’s instructions and load ratings again instead of assuming an open space can take any weight. Imagine you first set up a rack for hand tools and finishing supplies, then buy a benchtop drill press. Its weight and footprint may call for a lower position, a different shelf arrangement, or another support surface. Measure the tool and its accessories, check the shelf rating, and preserve access to the bench and outlets. You may need to move lighter items upward or surrender space elsewhere; the point is to make a deliberate trade rather than crowding a heavy new tool into the first open spot. A small layout change now can prevent the tool from becoming a permanent obstacle in the aisle. Every so often, return misplaced items to their assigned spots, remove supplies you no longer need, and inspect the rack for loosened hardware or visible damage. These checks catch small changes before a sagging shelf or loose fastener becomes a larger problem. If a shelf has begun to sag or a fastener has pulled free, unload it and address the problem according to the manufacturer’s instructions before using it again. A five-minute reset after a project is easier than sorting a whole wall of unlabeled boxes later. That routine keeps the floor clear and lets the shelving adapt instead of becoming a new place to hide clutter.Frequently Asked Questions
How do I choose the right size shelving unit for my workshop?
Measure the usable wall width and ceiling height, then check door swings, workbench access, outlets, and walking paths. Measure the largest items you plan to store and allow room to lift them on and off the shelves. A unit that fits the wall still needs to fit your work routine.How much weight can a workshop shelf hold?
Use the manufacturer’s stated rating and check whether it applies to each shelf or to the entire unit. Follow any instructions about assembly, loading, and installation, and keep loads within the stated limit. The rack and its supporting wall or floor must also suit the load.Do vertical shelving units need to be anchored?
Follow the manufacturer’s instructions and consider the unit’s height, shape, loading, and location. Anchoring is especially important when a tall or narrow unit could tip and injure someone or damage equipment. Use the specified method and suitable attachment points.What should I put on the top shelves?
Keep lightweight, infrequently used items up high, such as an empty storage bin or seasonal supplies. Put heavy, bulky, or awkward objects low to reduce lifting strain and help the unit stay stable. Use a stable step stool or ladder to reach high shelves.Are metal shelves better than wood shelves for a workshop?
Steel shelves often suit heavier tools and equipment when their capacity rating matches the load. Wood or composite shelves can work for lighter storage. Compare the product’s load rating, construction, moisture resistance, and cost for your actual shop conditions.How can I stop small hardware from getting lost on shelves?
Use bins, drawer organizers, or clear containers labeled by type or project. Keep frequently used parts within comfortable reach and return them to the same labeled spot after a job. Grouping hardware consistently makes it quicker to find than sorting a mixed box.Conclusion
Start with a tape measure, a list of what you need to store, and a clear picture of how you move through the shop. Choose shelves that suit the load and the room, then place the heavy tools low and the everyday supplies where your hands naturally reach. Labels and a quick reset after each project will keep the wall useful. A well-planned rack gives you back the floor without making the ceiling a junk drawer. Keep what you use easy to find, and the next project can start with a clear bench and open space to work.Halloween Picks
halloween
As an affiliate, we earn on qualifying purchases.