
TL;DR
Sanding and abrasives for fine finish means working through progressive grits (typically 120 → 180 → 220 for wood), matching the abrasive mineral to the material, and letting the paper cut rather than your arm pressure. Sanding past 220 on bare wood is usually wasted effort — the finish itself needs tooth to grip. Dust extraction of at least 350–400 CFM at the tool, plus a light between-coat scuff with 320–400 grit, does more for the final result than any exotic abrasive.
The most expensive finish you own can’t hide a bad sanding job. I learned that on a walnut console table years ago: three coats of hand-rubbed oil varnish, and under the raking light every skipped grit showed up like contour lines on a map. That’s the thing about finishing — the finish doesn’t cover your sanding sins, it publishes them.
Sanding is the least glamorous hour in the shop, but it’s the one that decides whether your project looks factory-made or garage-made. The good news: it’s not talent, it’s process. Grit progression, abrasive selection, and dust control. That’s ninety percent of it.
This guide walks through abrasive minerals, grit numbers, machine vs. hand sanding, and the between-coat work that separates a fine finish from a mediocre one — all sized for a real garage shop, not a production floor.
Stock aluminum oxide for bare wood (80–220), silicon carbide for between-coat and wet sanding (320–600), garnet for final hand work — skip ceramic unless you’r…
Never skip more than one grit step; each grit’s job is to erase the previous grit’s scratches.
Stop sanding bare wood at 220 grit — most film finishes adhere better to a 220 surface than to a polished 400 surface.
End every grit sequence with a hand-sanded pass using the same grit on a flat block to erase orbital swirl marks.
A shop vac with HEPA filter and a cyclone separator plus an N95 or P100 respirator is the realistic dust-control setup for a garage shop.
A Guide to Sanding and Abrasives for Fine Finish
The finish doesn’t cover your sanding sins — it publishes them. This guide covers abrasive minerals, grit progression, machine vs. hand sanding, and between-coat work that separates a fine finish from a mediocre one. Sized for a real garage shop, not a production floor.
“The most expensive finish you own can’t hide a bad sanding job.”The First Rule of Finishing
Which Abrasive Mineral Should You Actually Buy?
| Abrasive | Best For | Lifespan | Relative Cost |
|---|---|---|---|
| Aluminum oxide | Bare wood, all grits — self-fracturing grains stay sharp | Long | $ |
| Silicon carbide | Between coats, wet sanding, non-ferrous metal & plastic | Medium | $$ |
| Garnet | Final hand sanding of bare wood — soft, gentle cut | Short | $ |
| Ceramic | Aggressive stock removal, belt sanding, heavy shaping | Very long | $$$ |
Aluminum oxide 80–220
The all-around workhorse for bare wood through every grit. Durable and self-fracturing, so it stays sharp longer.
Silicon carbide 320 / 400 / 600
A small stack handles between-coat scuffing and wet sanding of cured finish. Harder and sharper, but wears faster.
Open-coat for gummy wood
Spaced grains shed dust — perfect for pine or finish removal. Closed-coat cuts faster on clean hardwood. Closed-coat aluminum oxide covers 90% of home-shop work.
Grit Isn’t About Smoothness — It’s About Scratch Signature
Why stop at 220?
Liquid finish is a glue, and glue bonds to surface area. A 220-grit surface is microscopic mountain terrain — thousands of peaks and valleys the finish keys into. Polish to 400 and you’ve flattened it into a parking lot: weaker first-coat adhesion, and eventually flaking or peeling on a tabletop that sees abrasion and heat cycles.
Sand a Panel Without Swirl Marks: A 5-Step Sequence
Start coarse
Begin at the grit that removes the worst defects — usually 80 or 120.
Slow & overlapping
Random orbital at moderate speed, ~1 inch per second, with the grain, overlapping passes by half the pad width.
Let paper cut
The sander’s weight is enough pressure. Pressing down glazes paper and bakes in swirls.
Change early
Swap paper when it stops cutting, not when it’s smooth — every 5–10 minutes on hardwood.
Hand-finish
End every grit sequence with a hand-sanded pass at the same grit on a flat block to erase orbital swirls.
The Realistic Garage-Shop Dust Setup
Dust extraction does more for the final result than any exotic abrasive. Loaded paper stops cutting and starts burnishing — polishing fibers closed and leaving blotchy patches where stain grabs unevenly.
The setup that works
- Shop vac with a HEPA filter as the extraction heart
- Cyclone separator to protect the filter from fine dust
- N95 or P100 respirator — airborne dust is the hazard you can’t see
- Vacuum or tack between every grit and every coat
Which Abrasive Mineral Should You Actually Buy?
The four abrasives you’ll see on shelves are aluminum oxide, silicon carbide, garnet, and ceramic, and each has a job. Aluminum oxide is the all-around workhorse: durable, self-fracturing so it stays sharp, and right for sanding bare wood through every grit. Silicon carbide is harder and sharper but wears faster — it’s the mineral for wet sanding finish coats and for non-ferrous metals and plastics. Garnet cuts gently and dulls fast, which sounds like a flaw but makes it beloved for final hand sanding of bare wood. Ceramic belongs in aggressive stock removal — belt sanders and heavy shaping — and it’s overkill (and overpriced) for finish work.
Here’s the garage-shop translation: keep aluminum oxide in 80 through 220 for bare wood, a small stack of silicon carbide in 320, 400, and 600 for between-coat and wet sanding, and a few sheets of garnet 150/220 for handwork where you want a soft cut. Ceramic is a pass unless you’re hogging off serious material.
Open-coat vs. closed-coat matters too. Open-coat paper has spaced grains that shed dust — perfect for gummy woods like pine or old finish removal. Closed-coat packs grains tighter for faster cutting on clean hardwood. Most boxed assortments are closed-coat aluminum oxide, which is fine for 90% of what a home shop does.
| Abrasive | Best For | Lifespan | Relative Cost |
|---|---|---|---|
| Aluminum oxide | Bare wood, all grits | Long | $ |
| Silicon carbide | Between coats, wet sanding, metal/plastic | Medium | $$ |
| Garnet | Final hand sanding of bare wood | Short | $ |
| Ceramic | Aggressive stock removal | Very long | $$$ |
As an affiliate, we earn on qualifying purchases.
Grit Numbers Decoded: What Each Grade Really Does
Grit numbers describe how many abrasive particles fit through a screen per square inch — lower numbers mean bigger, more aggressive grains. Coarse grits (40–80) remove material fast. Medium grits (100–180) remove the scratches left by coarse paper. Fine grits (220–400) prep for finish or scuff between coats. Extra-fine (600+) is for polishing cured finish, almost never for bare wood.
Why does the hierarchy exist at all? Because every abrasive grain is a tiny chisel, and every chisel leaves a scratch proportional to its size. An 80-grit grain plows a valley roughly three times wider than a 220-grit grain. That means grit numbers aren’t really about smoothness — they’re about scratch signature. Your job at the bench isn’t “make it smooth”; it’s “trade big scratches for progressively smaller ones until the finish can bridge them.” A film finish like polyurethane levels into scratches up to a certain depth and then simply follows them, which is exactly why visible 80-grit channels telegraph through three coats of varnish like a topographic map.
The mental model that changed my sanding: each grit’s only job is to erase the scratches from the previous grit. If you jump from 80 to 180, the 180 paper spends its life — literally, its whole useful life — trying to remove 80-grit scratches it can’t reach. You’ll burn through three sheets and still see the coarse marks under finish. The tradeoff is time: the closer together your grit steps, the fewer total passes each grit needs. Sanding 80 → 120 → 180 is almost always faster in aggregate than skipping to 180 and muscling through, because fine paper cutting coarse scratches dulls within a minute or two, and then you’re paying sandpaper prices to accomplish nothing.
The rule of thumb is to skip no more than one grit step at a time — 80 to 120 to 180, not 80 to 180. On hardwoods, going 120 → 150 → 180 → 220 is the classic progression for a furniture surface. On soft woods that clog paper, add a step so you’re not fighting pitch buildup — the clogging isn’t cosmetic, either: loaded paper stops cutting and starts burnishing, which polishes the wood fibers closed and can leave blotchy patches where stain later grabs unevenly.
The most common sanding mistake isn’t too coarse or too fine — it’s skipping grits and then pressing hard to compensate, which grinds swirls into the surface that no finish will hide.
And here’s the counterintuitive part: 220 is usually the stopping point for bare wood. Most film finishes grip better to a 220 surface than a polished 400 one. The reason is mechanical adhesion: liquid finish is a glue, and glue bonds to surface area. A 220-grit surface is microscopic mountain terrain — thousands of tiny peaks and valleys that give the finish something to key into. Polish that same surface to 400 and you’ve flattened the terrain into a parking lot. The finish has less to grip, the first coat can cure with weaker adhesion, and on something like a tabletop that gets abrasion and heat cycles for years, weak first-coat adhesion eventually shows up as flaking or peeling. You’re not just wasting paper past 220 — you’re mildly sabotaging the finish’s ability to stay put.
As an affiliate, we earn on qualifying purchases.
How to Sand a Panel Without Swirl Marks: A 5-Step Sequence
A swirl-free surface comes from machine discipline plus one hand-sanding pass at the end. This sequence works for any flat hardwood panel — a tabletop, a door slab, a cabinet side.
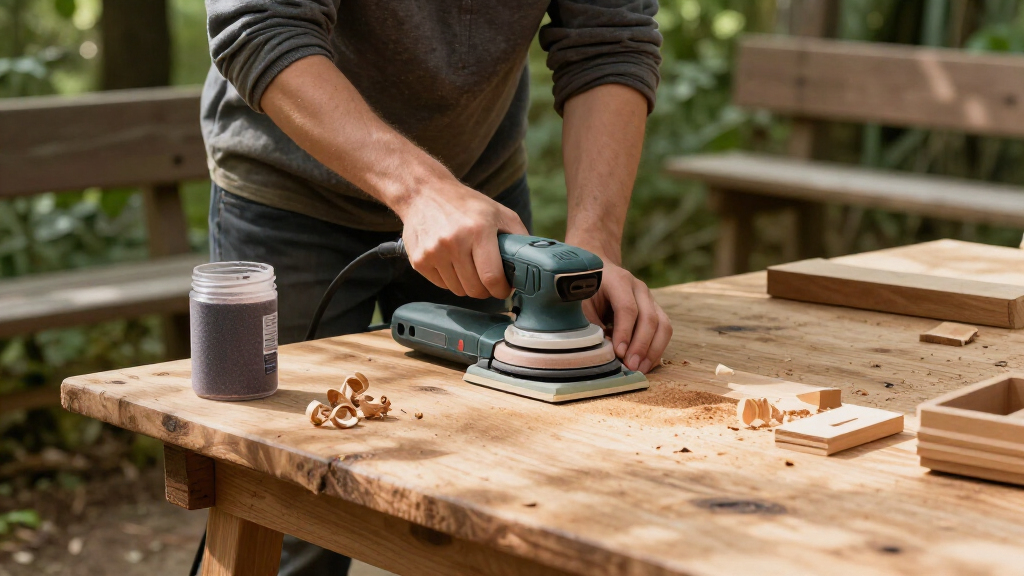
- Start at the grit that removes the worst defects — usually 80 or 120. Run a random orbital sander at moderate speed, moving slowly (about 1 inch per second) with the grain, overlapping passes by half the pad width.
- Let the paper do the work. The weight of the sander is enough pressure. Pressing down slows the pad, glazes the paper, and bakes swirl marks into the wood.
- Change paper when it stops cutting, not when it’s smooth. A dull sheet polishes instead of cuts. On hardwood, expect to swap every 5–10 minutes of continuous sanding.
- Remove every machine marks with one final hand-sanded grit. After your last machine grit (say 180), hand sand the same area with 180 on a flat cork or rubber block, with the grain. This erases orbital swirls in two minutes flat.
- Vacuum, then tack, before finishing. Vacuum with a soft brush, then wipe with a tack cloth or a lint-free rag lightly dampened with mineral spirits. Dust under finish is the number one cause of that rough first coat.
That hand-block pass in step four is the one everybody skips, and it’s the difference. On a cherry end table I built a few years back, I machine-sanded to 220 and called it done — under the first coat of wiping varnish, faint orbital moons showed up exactly where I’d rushed. Twenty minutes of block sanding would have saved a full strip-and-restart.
As an affiliate, we earn on qualifying purchases.
Dust Collection: The Upgrade That Improves Your Finish More Than Fancy Sandpaper
Dust extraction is the highest-leverage finishing upgrade in a small shop, and it’s not close. A sander running without extraction pumps fine dust back between the pad and the wood, where it acts like grinding compound — scratching the surface you just prepared and loading the paper early. It also puts fine wood dust, a known respiratory hazard especially with hardwoods like oak and walnut, straight into the air of a room you’ll be standing in for an hour.
For a garage shop, here’s the realistic tier structure. A shop vacuum with a HEPA filter and a dust-separating cyclone bucket between the vac and the sander gets you functional extraction for around $100–150 and delivers real airflow at the tool. A dedicated dust extractor (think Festool-class, 90+ CFM at the hose with true HEPA) is the pro tier — noticeably better, especially for fine finish work, but not mandatory for a hobby shop. What matters most is matching hose diameter to your sander’s port and keeping the filter clean; a clogged filter kills airflow faster than a cheap vac does.
Always wear a minimum of an N95 respirator — a P100 half-mask is better and costs about $35 — plus sealed safety glasses. Dust collection protects the finish; the respirator protects you. They’re separate purchases and you need both.
As an affiliate, we earn on qualifying purchases.
Between-Coat Sanding: Where Fine Finishes Are Actually Won
The pro-looking difference in a finish isn’t in the bare-wood prep — it’s in the between-coat sanding, called scuff sanding. After each coat of varnish, lacquer, or polyurethane dries, dust nibs and raised grain leave a rough surface. Scuff sanding with 320 or 400 grit silicon carbide, just enough to knock the sheen down to a uniform dullness, gives the next coat a mechanical key and builds that deep, glass-smooth build.
Use stearated (self-lubricating) sandpaper here — it resists clogging on cured finish. Weigh almost nothing: let a soft pad or your fingertips behind the paper do it. You’re removing dust nibs, not finish. If you’re generating powder, you’re pressing too hard; you want a fine, powdery haze and no glossy patches left behind.
For a mirror finish — the wet-look piano-black territory — the progression goes: last full coat cured fully, then wet sand with 600, then 1000, then 1500 or 2000 silicon carbide using water with a drop of dish soap as lubricant, then polish with a rubbing compound. Wet sanding keeps the paper from clogging and floats away swarf that would otherwise scratch. This is standard practice in automotive work, and it transfers directly to a high-gloss finish on wood.
Scuff sand every coat except the last. Dull the sheen uniformly, vacuum, tack, recoat. Three coats done that way beat six coats slapped on rough.
One caution: read your finish’s recoat window. Some waterborne finishes need sanding if you miss the window; some oil products need it regardless. The label isn’t fine print — it’s the recipe.
Machine or Hand? Matching the Tool to the Surface
Random orbital sanders handle most flat and gently curved work in a home shop; hand sanding owns the rest. Knowing which surface belongs to which tool saves both time and wood — because the wrong tool doesn’t just work slowly, it removes material in ways you can’t undo.
A 5-inch random orbital sander is the garage-shop default: versatile, affordable ($60–120 gets a genuinely good one with decent extraction), and hook-and-loop discs make grit changes a five-second job. Picture a 24-inch maple tabletop: the random orbital takes it from 120 through 220 in twenty minutes with overlapping passes, and the random-orbit action means no single scratch pattern repeats. A detail sander (mouse-type) reaches inside corners and tight curves — think the inside faces of a lattice door or the slots in a cutting-board handle — but leaves more visible scratch patterns, so follow it with hand sanding. Belt sanders are for flattening glue-ups and heavy stock removal only; on a finished-thickness panel they’re a roulette wheel. I watched a friend take a gouge clean through a walnut board’s final thickness in one distracted pass — that’s a repair job, not a sanding job. For moldings, profiles, and edges, nothing beats contour-fitting hand sanding: wrap paper around a dowel for coves (a chair leg’s transition curve, for example), use a foam-backed sponge for profiles like ogee trim, and fold a quarter-sheet for edges.
Hand sanding also wins at the end of every grit sequence on flat work. The machine cuts fast; the block cuts true. My rule: machines shape and refine, the last grit by hand always. On curved cherry rockers I built, the arms got machine work nowhere — 100 percent wrapped-paper hand sanding, because a round pad on a compound curve digs flat spots you’ll see forever under finish. Think of it like a hard pad hovering over a basketball: it only touches the high point, and the high point is what disappears — leaving a facet instead of a curve. A soft backing or your hand conforms to the curve and cuts it evenly.
- Random orbital: flat panels, wide faces, most grits
- Detail/multi-tool: corners, slots, tight curves (finish by hand)
- Belt sander: flattening slabs and glue-ups only
- Hand + block: final grit on flats, all profiles, edges, veneer
- Sponge/foam pad: curved and molded surfaces
Frequently Asked Questions
What grit should I sand to before applying finish?
For most film-building finishes — polyurethane, lacquer, waterborne — 220 grit is the standard stopping point for bare wood. Sanding finer than 220 on bare wood rarely improves the final result and can reduce adhesion, since finishes grip microscopic scratches. For oil-only finishes, some woodworkers stop at 180; the oil soaks in either way and extra polish adds little.
Can I reuse sandpaper?
Yes, until it stops cutting. A self-fracturing abrasive like aluminum oxide keeps exposing fresh edges, so a sheet can last through several sessions if you clean it. Tap it against a bench or blow it out (with a respirator on). When the paper feels smooth and generates heat instead of dust, it’s done — a dull sheet polishes rather than cuts and will tempt you to press too hard.
What’s the difference between wet sanding and dry sanding?
Wet sanding uses water (with a drop of dish soap) as a lubricant with waterproof silicon carbide paper. It cuts slower and finer, prevents clogging, and floats away particles that would scratch — which is why it’s the standard for leveling cured finish coats and automotive work. Dry sanding is for bare wood, where water would raise the grain. Never wet sand bare wood before a waterborne finish without letting it dry fully and re-sanding raised grain.
How much dust extraction do I actually need for sanding?
For a garage shop, a shop vacuum with a HEPA filter and a cyclone separator between the vac and the sander covers fine finish sanding well. What kills performance isn’t vacuum power — it’s a clogged filter or a mismatched hose diameter. Keep the filter clean, match the hose to the sander port, and empty the separator regularly. A dedicated HEPA dust extractor is better but not required for hobby work.
Why does my finish feel rough after the first coat?
Almost always raised grain or dust nibs — both normal. Wood fibers swell when they contact the liquid finish, and airborne dust lands in the wet coat. The fix is a light scuff sand with 320 or 400 grit once the coat is fully dry, just enough to knock the roughness down, then vacuum and tack before the next coat. The second coat almost always goes down smoother because the first coat sealed and locked the grain.
Do I need to sand between every coat of finish?
Sand lightly between every coat except the last, using 320–400 grit stearated paper. The goal is to dull the sheen uniformly and remove dust nibs, not to remove finish. Within the recoat window listed on the can, some finishes chemically bond without sanding — but scuffing anyway costs two minutes per coat and guarantees a mechanical bond, which is cheap insurance on a project you’ve spent weeks building.
Conclusion
If you remember one thing: sanding is grit discipline, not muscle. Let the paper cut, progress one step at a time, finish flats by hand, and scuff between coats. The finish you brush on is only as good as the surface you give it — every coat of varnish is a truth serum for what happened underneath.
Set up your next project with a labeled stack of discs per grit, a clean vac hose, and a cork block. Then hit the light switch sideways at the end and rake a lamp across the surface before you touch the finish can. If it looks good under raking light, it’ll look great under anything.