
TL;DR

Get tools and workshop supplies delivered free — and shop member deals
- Fast, free delivery on millions of items
- Access to Prime Big Deal Days deals on October 6–7
- Prime Video, Amazon Music and more included
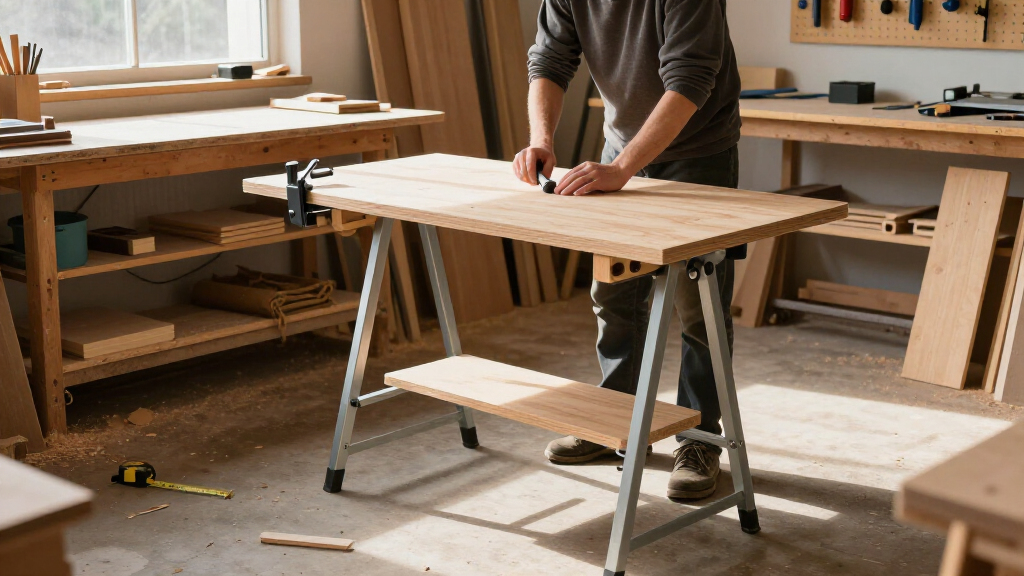
A portable assembly table for a small workshop should fit through your doors and around your machines, stay planted under clamping forces, and support the projects you actually build. Measure the storage route, choose a comfortable height, brace the base, and add replaceable top skins; then pick locking casters or securely locking folding legs to match how you store and use it.
A portable assembly table can save a small garage shop from a familiar shuffle: move the planer, drag out the sawhorses, then discover the project still has nowhere flat to sit. A well-planned table gives you a steady, flexible work surface when you need one and clears the floor when you do not.
This guide walks you through the choices that make the difference: table size, working height, top construction, clamping, and mobility. You’ll see how to fit the table to your most common projects without building a heavy bench that jams the aisle or a lightweight one that skitters when you clamp a cabinet side.
Start with the work you do most. If you assemble face frames and small cabinets, your needs differ from someone gluing up a dining table or using a vise for hand-tool work. A little measuring now can turn designing a portable assembly table for your shop into a practical build instead of a handsome obstacle.
Measure the full route and storage location, then tape out the proposed footprint before building.
Mock up finished table height with the top and casters included; test it with a real assembly task.
Support the top across its span and use a replaceable skin to take glue and wear.
Match dog holes or tracks to clamps and accessories you already own; test the layout before drilling.
Lock the wheels or folding braces before work, and keep heavy loads centered over the frame.
Small shop · practical build guide
Designing a Portable Assembly Table
Build a flexible work surface that fits your projects, moves through your shop, and stays steady when the clamps come out. Plan the route, height, top, and base before you cut.
01 / Start with your shop
Fit the footprint to the work
A table that only works in the middle of the room is portable in name alone. Measure the workpiece and every turn on the route to its storage spot.
Map the route
Check door openings, machine aisles, corners, and the storage location. Include the table’s full width and height as it moves.
Allow clamp room
Size the top for common projects plus tool and clamp clearance. A 24 × 48 in top can suit drawers and small cabinets.
Tape the outline
Mark the proposed footprint on the floor and walk your normal paths before cutting. Check the folded or stored footprint too.
Clearance can matter more than extra surface
Leave room around the work for clamps. For occasional oversized builds, consider roller stands or a temporary extension instead of permanent bulk.
02 / Ergonomics
Mock up the finished height
Your posture, work style, and heaviest assemblies set the height. Measure from the floor to the finished top, including casters, feet, and the top itself.
Try 30–34 inches
This range works as a first mock-up for many tasks, but it is not a universal standard. Test with a sample frame before fixing leg length.
- Stack plywood or use sturdy sawhorses to reach the planned finished height.
- Spend ten minutes assembling a sample: raise the surface if you hunch; consider lower if lifting heavy cabinets.
- Include caster height in your measurement. Wheels can make a careful leg cut too tall.
- Use adjustable feet to level the table on uneven concrete, and keep the work surface level.
03 / Top construction
Build for flatness and repair
A well-supported top matters more than thickness by itself. Give glue, knife marks, and sanding scratches a replaceable surface to land on.
| Top choice | Works well for | Tradeoff to plan for |
|---|---|---|
| Plywood + replaceable skin Practical / adaptable | Everyday assembly and budget-conscious builds | Protect edges and check flatness before assembly |
| Solid lumber panel Traditional feel | A repairable surface with a classic bench feel | May move with garage humidity; needs stock preparation |
| Metal frame + sheet top Slim / rigid base | A narrow rigid base with a replaceable work surface | Needs metalworking tools or suitable purchased hardware |
Prevent spring
A ¾-inch plywood sheet can work when the frame supports it at sensible intervals. Across a wide open span, the same sheet may flex under a clamp.
Protect the main top
Hardboard or plywood takes glue squeeze-out, finish, and wear. Replace the sacrificial layer instead of rebuilding the structural surface.
Stiffen with intent
A second laminated layer adds stiffness, but also adds weight you must lift or roll. Match construction to the span and expected loads.
04 / Hold-downs
Add only the clamping you’ll use
Choose dog holes, tracks, slots, or a removable vise around the clamps and accessories already in your shop. Modularity keeps future options open.
Secure cabinet sides
Place tracks where clamps can reach the workpiece while you check the assembly for square.
Hold small parts
A hole pattern earns its place when you regularly hold drawer fronts, panels, or parts for sanding.
Make a template
Lay out real accessories full-size. Check frame rails and clamp travel; drill one test hole in scrap before committing.
Start simple, then upgrade
A plain top with a replaceable skin can accept tracks or a dog-hole panel later. Match complexity to how often you assemble and clamp work.
05 / Mobility & stability
Choose a base that stays planted
Portability includes loaded weight, handles, detachable parts, and setup time. The base must resist wobble and racking when you clamp, sand, or plane.
Decision guide
Wheels or folding legs?
Choose around how you store and use the table. Either system needs a secure lock before work begins; movement under load can compromise control.
Brace the base
Use rigid joints and bracing to resist racking. Support the top and keep the frame square under hand pressure.
Center heavy work
Estimate the largest workpiece and your clamping forces. Keep heavy loads over the frame, away from unsupported edges.
Lock before work
Lock wheels or folding braces, level the table, and check stability before applying force or loading a project.
06 / Build sequence
Expose problems early
Move from space planning to loaded testing so fit and stability issues show up before the table is fully finished.
Map space
Measure route, footprint, and storage.
Mock height
Test a real assembly at the finished level.
Build base
Make a square, braced frame.
Support top
Check span, flatness, and load path.
Plan clamps
Fit accessories before drilling.
Test mobility
Lock, load, and check for movement.
Traceability / design logic
Let the work shape the table
A practical design follows a clear chain: start with the projects, then make every dimension and feature serve the real workflow.
Choose a footprint that fits your projects and your doorway
A portable assembly table should hold your common projects while still fitting through the route you’ll use to move and store it. Measure the project, the aisle, the doorway, and the storage spot before you settle on top dimensions; a table that works only in the middle of the shop is portable in name alone.
For example, if you build kitchen drawers and small cabinets, a top around 24 by 48 inches may give you room for a carcass, clamps, and a glue bottle without crowding the table saw. A larger top helps with doors or wide panels, but can snag on a planer stand or block the path to the garage door. Tape the proposed footprint on the floor and walk your usual routes before cutting plywood.
Think about the workpiece plus the tools around it. Four inches of clamp clearance on each side can matter more than another foot of surface you rarely use. If your biggest job is an occasional dining table, you can support long parts with roller stands or a temporary extension instead of building every-day bulk into the table.
When designing a portable assembly table for a small shop, the folded or stored footprint deserves the same attention as the open one. A table that slips beside a freezer or under a lumber rack can give your shop a flexible work surface without permanently claiming floor space.
Set a height that saves your back and suits the task
A good assembly-table height lets you work with relaxed shoulders and control the piece without hunching or reaching. The right number depends on your height, whether you stand or sit, and whether you mostly spread glue, align parts, or do detail work; try a temporary mock-up before you commit to leg length.
Stack a sheet of plywood or a pair of sturdy sawhorses to approximate the planned height, then spend ten minutes assembling a sample frame. If you find yourself leaning over to check a joint, raise the surface. If you’re lifting a heavy cabinet onto it, a slightly lower top may feel safer and more controlled. These small trials beat discovering the mistake after the glue has set.
For a real garage-shop example, a woodworker who is comfortable standing at a 36-inch bench may still prefer a lower assembly surface when lifting a heavy base cabinet onto the table. A height around 30 to 34 inches is a useful starting range for many standing assembly tasks, but it is not a universal standard. Test your own posture with the thickest top and any leveling feet included.
Uneven concrete can make a carefully sized table feel awkward. Adjustable feet can level the table on a sloped floor, while casters add height that you must include in your measurement. Write down the height from the floor to the finished top, not just the leg length.
Build a top that stays flat and shrugs off glue
A flat, well-supported top matters more than a thick slab by itself. Plywood makes a practical choice because it is stable and widely available, while a replaceable hardboard or plywood skin takes the glue drips, knife marks, and sanding scratches that would otherwise damage the main surface.
Imagine gluing up a face frame on a clean skin: squeeze-out beads on the sacrificial layer, you peel or replace it later, and the structural top stays usable. If you build with solid lumber, account for seasonal movement; a wide solid panel can cup or change dimension as the garage humidity swings.
| Top choice | Where it works well | Tradeoff to plan for |
|---|---|---|
| Plywood with replaceable skin | Everyday assembly and budget-conscious builds | Edges need protection; check flatness before assembly |
| Solid lumber panel | Traditional bench feel and repairable surface | Can move with humidity and takes more stock preparation |
| Metal frame with sheet top | Slim, rigid base with a replaceable working surface | Requires metalworking tools or suitable purchased hardware |
Support the top so it cannot sag across its span. A 3/4-inch plywood sheet may be plenty when a frame supports it at sensible intervals; the same sheet spanning a wide open base can feel springy under a clamp. A second laminated layer adds stiffness, but also adds weight that you must lift or roll.
Make the wear surface replaceable. A sacrificial skin is a cheap way to keep glue, finish, and hardware from turning your main top into a permanent record of every project.
Add clamping features you’ll actually use
Clamping features make an assembly table more useful when they match the clamps and accessories already in your shop. Dog holes, tracks, bench-dog slots, and a removable vise all help hold parts, but each takes space, money, or setup time; choose the ones tied to jobs you do regularly.
If you already own track clamps, a pair of embedded tracks can secure cabinet sides while you check for square. If you use bench dogs to hold drawer fronts during sanding, a hole pattern may earn its keep. Before drilling, lay out the actual accessories on a full-size paper template and confirm the holes won’t land over a frame rail or interfere with a clamp’s travel.
A common mistake is installing a dense grid because it looks capable, then discovering that the first row sits under the project’s edge or that the dogs are the wrong diameter for the hardware on hand. Make one test hole in scrap, fit a dog, and clamp a representative workpiece before committing to the whole top. That small test can save a clean sheet of plywood.
Modularity lets you start simple. A plain top with a replaceable skin can accept a track or dog-hole panel later. If you assemble one small bookshelf a month, a few clamps and a stop may do the job; a cabinetmaker building every day may value a more complete hold-down setup.
Pick wheels or folding legs without giving up stability
Locking casters let you reposition a heavy table quickly, while folding legs reduce the storage footprint; either design must lock firmly before you work. Mobility changes the table’s feel: wheels can add height and a little movement, and folding hardware introduces joints that need secure locks and regular checks.
Picture rolling a cabinet carcass across the shop, then locking all four casters before clamping the back panel. If even one wheel swivels or rolls under pressure, the table may creep at the exact moment you need both hands on the joint. Choose casters rated for the total table and workpiece load, and test their brakes on your actual floor rather than trusting the label alone.
Folding legs suit a garage that must return to parking duty. A table with positive-locking braces can fold flat against a wall, but the lock should be easy to inspect and impossible to bump loose while loaded. Keep fingers clear of hinge pinch points during setup, and never rely on friction alone to hold a leg open.
Build the base to resist racking before you choose accessories. Diagonal bracing, rigid corner joints, and a lower stretcher can help a table stay square when you push a plane or tighten a clamp. A portable assembly table should move when you ask it to—and stay still when you work.
Size the frame for real loads and everyday abuse
A table’s safe load depends on its materials, joints, supports, and how the weight sits on the top, so a generic capacity number cannot tell you whether your design is sound. Start with the heaviest workpiece you expect to handle, then account for the downward force of clamps and the sideways force of planing or sanding.
For a small shop example, a 90-pound cabinet spread across a supported top creates a different problem from a 90-pound cabinet perched near one unsupported corner. Keep heavy loads centered over the legs or frame rails, and add support where a long top overhangs. Cross-bracing helps the base resist a sideways shove; it does not make a weak joint strong.
Construction-grade plywood and common lumber can keep costs manageable if you select flat, sound stock and build tight joints. A metal frame can stay slim and rigid, but it may call for welding or metalworking skill. If you lack those tools, a well-braced wood frame is often the sensible budget tier for a garage shop.
Do not confuse an assembly table with a heavy hand-tool bench. A light, rolling design may handle glue-ups beautifully yet move under hard planing or mallet blows. If you need both jobs, design a removable base lock or add a dedicated bench for the heavier work rather than asking a folding mechanism to absorb repeated impact.
Build and test the table in six practical steps
Build the table in the order that exposes fit and stability problems early: map the space, mock up the height, build a square base, support the top, add clamping features, and test the finished table under controlled conditions. This sequence helps you catch a doorway conflict before you have a heavy assembly to move.
- Measure the route and storage spot. Record the narrowest doorway, aisle, and turn, then tape the top footprint on the floor.
- Mock up the finished height. Include the top thickness and caster height, then try a sample assembly task for ten minutes.
- Build a rigid, square base. Use sound lumber or a suitable frame, tight joints, and bracing that resists side-to-side movement.
- Support and fit the top. Check it for flatness, support spans sensibly, and add a replaceable skin if you expect glue or finish spills.
- Install only proven clamping hardware. Test your clamps and dogs on scrap or a template before drilling or routing the final top.
- Check the locks and level. Set the table on its real floor, lock wheels or leg braces, and apply gradual hand pressure before loading a project.
For instance, if the table rocks when you push diagonally on an empty top, do not “test” it by piling on a cabinet. Find the loose joint, adjust the feet, or improve the bracing first. Keep the first load modest, centered, and observed; increase it only when the frame stays planted and the top remains flat.
Know when your assembly table can double as a workbench
A portable assembly table can double as a workbench only when its frame, top, and base can handle the extra forces from planing, pounding, and vise work. Assembly usually asks for a flat surface and steady clamping; hand-tool work can apply sharp sideways loads that expose flex or weak locks.
Suppose you’re making a small bookcase and want to plane one shelf edge. A table with locked casters and cross-bracing may feel solid enough for a light pass, but a hard stroke can still make a narrow wheeled base shimmy. The table’s usefulness depends on the job, so test with controlled pressure and watch the feet, joints, and top rather than assuming that a heavy-looking build is rigid.
A removable vise can add options, but only if its mounting points transfer force into the frame. Bolting a vise to a thin sheet top may crush the panel or loosen fasteners. Reinforce the mounting area and position it near a leg or substantial rail, or keep vise work on a dedicated bench.
Dust collection matters when you move from assembly to sanding. A small shop vacuum with a tool-triggered outlet can capture dust at a sander, though its airflow and hose size differ from a full-size collector rated in CFM. Keep hoses from catching a caster or folding leg, and use eye and respiratory protection when the task creates fine dust.
Spend first on rigidity, then add storage and upgrades
The best first upgrades are a rigid frame, a secure base, a comfortable working height, and clamping points that fit your tools. Shelves, drawers, and specialized accessories can wait until the table proves useful; extra storage adds weight and can make a folding design harder to move.
On a tight budget, build with flat plywood and common lumber, add a replaceable skin, and use reliable locking casters or folding hardware sized for the load. Spend carefully on the locks and joints, because a bargain wheel that creeps under pressure can undermine the whole design. A pro-tier metal frame or precision track system can be worthwhile for daily production, but occasional garage assembly rarely needs every feature at once.
Think through the sequence of upgrades. You might begin with a plain top, then add a track on the long edge after you notice that most of your clamps need a better anchor. If a future upgrade requires replacing the entire top, make the top removable now with accessible fasteners and a frame layout that leaves room for later hardware.
For a small workshop, a portable assembly table gives a small workshop a flexible work surface when it can roll or fold away without sacrificing a stable work session. Build for the jobs you actually do, then let real use—not a catalog of accessories—tell you what to add next.
Frequently Asked Questions
How large should a portable assembly table be?
Choose a top that fits your common projects and the clamps you use, then check the doorway, aisle, and storage spot. A 24-by-48-inch top can suit small cabinet and drawer work, while larger panels may need a temporary extension or support stands.
Are wheels or folding legs better for a portable table?
Wheels suit a table you reposition often, provided the casters lock firmly and the base stays stable under load. Folding legs save storage space, but use reliable locking braces and keep fingers clear of pinch points during setup.
What is a comfortable assembly-table height?
It depends on your height and the work. Try a mock-up before cutting legs; many people start around 30 to 34 inches for standing assembly, then adjust based on posture and the effort of lifting heavy parts.
How thick should the table top be?
Top thickness depends on the frame spacing and expected loads. A well-supported 3/4-inch plywood top can work for many assembly tasks, while a longer unsupported span may need more support or a laminated layer. A replaceable thin skin protects the main top from glue.
Do I need dog holes or a track system?
Add them if you regularly use bench dogs, track clamps, or stops. Lay out your actual accessories on a template and test the spacing before drilling; a plain, replaceable top is easy to upgrade later.
Can I use a portable assembly table as a workbench?
Yes, if the frame and base handle the forces from planing, pounding, or vise work. A light table that works well for glue-ups may shift under hard hand-tool work, so test it gradually and keep a dedicated bench for heavy tasks if needed.
Conclusion
Build your table around the work you actually make: a footprint that clears the doorway, a height your back likes, a top that stays flat, and a base that locks solid under pressure. Start with those four decisions, then add clamping hardware as your projects call for it.
When the glue-up is done, the best portable table rolls quietly out of the aisle and leaves the garage floor open again. That’s a small-shop win you can feel every time you pull in the car.
Fall yard work Picks
leaf blowers
As an affiliate, we earn on qualifying purchases.