TL;DR

Get business pricing on tools and workshop supplies
- Business-only prices and quantity discounts
- Tax-exempt purchasing
- Multiple users, one account, clear invoices
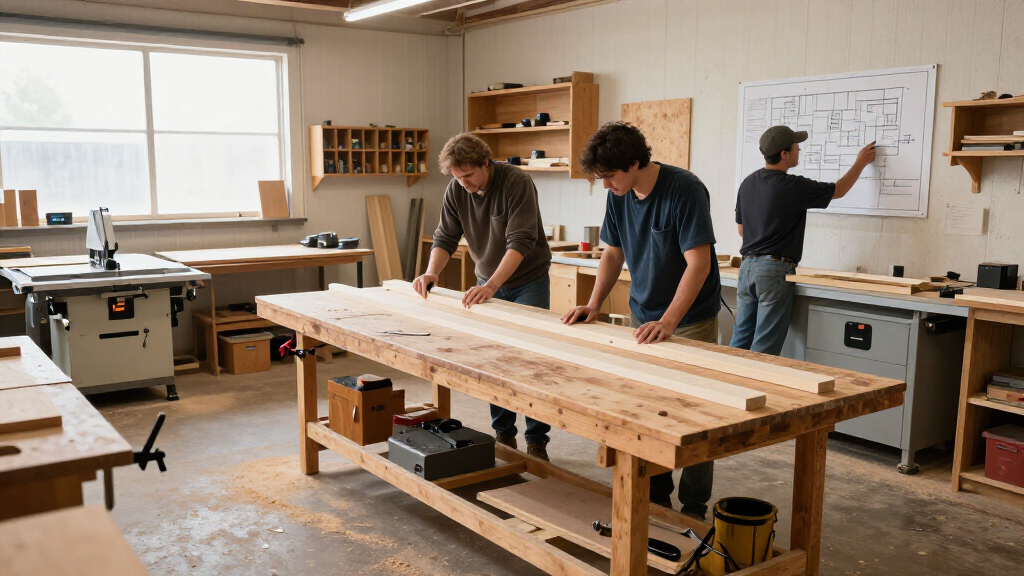
Designing a shop layout for multiple users starts with the work: map how lumber and projects move from delivery to cutting, assembly, finishing, and cleanup, then place machines and storage around that flow. Preserve the clearances required by machine manuals, keep aisles and exits open, and use labeled storage, booking rules, and flexible staging areas to reduce conflicts in a small shop.
A table saw can have plenty of room around it and still cause a traffic jam if someone has to carry an eight-foot board through the only path to the assembly bench. In a shared shop, the work and the people move together, so a layout that suits one woodworker can frustrate three.
Designing a shop layout for multiple users means planning more than machine locations. You need a sensible path for materials, safe operating space, reachable storage, dust collection, and clear agreements about shared tools and unfinished projects. This guide shows you how to fit those pieces together, whether you have a dedicated workshop or one garage bay that has to serve several people.
Map the route from lumber delivery through milling, assembly, finishing, and cleanup before placing machines.
Use each machine’s manual and applicable local requirements to plan operating clearances and safe procedures.
Give shared tools, consumables, and in-progress projects labeled, assigned homes.
Use visible reservations, training rules, and handoff routines to coordinate scarce equipment.
Review bottlenecks, tool searches, and near misses after people use the shop, then adjust the plan.
Shared Workshop • Layout Field Guide
Designing a Shop Layout for Multiple Users and Shared Projects
Plan the movement of people, materials, and projects together. A clear workflow, safe machine zones, and shared routines can make even a compact shop easier to use.
Draw the route before moving machines
Keep common work moving forward with fewer crossings. There is no universal floor plan: the right layout depends on your tools, materials, users, and available space.
Sketch to scale: Mark doors, posts, outlets, fixed equipment, storage routes, and exits. Add the footprint of the operator, tool, stock, and offcuts. A delivery route through a saw’s feed zone is a conflict even when the floor looks open.
Give every machine room for the whole task
Machine placement must account for operating clearance and the stock users need to handle. A short-part setup and a full-sheet cut have different space needs.
Check the manual
Use manufacturer guidance and applicable local requirements for clearances and safe procedures. A sketch helps plan; it does not replace those specifications.
Plan the full cut
Allow room for the operator, feed and outfeed, workpiece, and offcuts. Keep traffic clear while long boards or sheet goods are moving.
Protect routes
Keep aisles and exits open. Reach switches and emergency stops without crossing a hazardous zone; keep first aid, fire extinguishers, and suitable PPE easy to find.
Control dust and noise
Place finishing near suitable ventilation and away from milling dust where practical. Plan dust collection, lighting, electrical access, and waste handling with the layout.
Move with a plan
Mobile benches can free floor space when their parking spots are marked and moving them is practical. Keep cords and dust hoses out of aisles.
Design for varied users
Consider different heights, strengths, and mobility needs. Make controls, storage, and work surfaces reachable, and leave room for more than one person where needed.
Make tools and projects easy to find
Storage and agreements are part of the layout. Clear homes and routines reduce searching, crowding, and uncertainty between users.
Return tools consistently
Keep measuring tools and clamps near benches; store machine accessories near their stations. Label drawers and report damaged or missing tools.
Coordinate scarce equipment
Use a booking board or shared inventory to show reservations and who has specialty tools. Agree on training, cleanup, maintenance, and handoffs.
Give work a boundary
Assign homes to in-progress projects and materials. Reserve a staging area for glue-ups so carts and projects do not block exits or machine zones.
Keep changes reversible
Modular storage and adaptable benches can serve different projects. Keep heavy equipment stable and movable furniture clear of safe operating space.
Match each pressure point with a routine
Small agreements make the physical plan easier to maintain. Review how the space works after real projects move through it.
| Pressure point | Layout response | Shared routine |
|---|---|---|
| Long stock at a saw | Protect feed and outfeed space | Clear the zone before cutting |
| Tools go missing | Place labeled homes near use | Return and report after use |
| Projects crowd the floor | Mark a staging location | Reserve space and set a handoff |
| Dust reaches finishing | Separate processes where practical | Schedule, collect dust, and clean |
Adjust from evidence: Watch for bottlenecks, near misses, repeated tool searches, blocked routes, and cleanup problems. Use what people experience to revise the drawing and shared rules.
From material flow to shared habits
A reliable shop connects its physical arrangement to the way people work together.
Map the project path before you move a machine
Designing a shop layout for multiple users works best when you place tools around the sequence of work, not around whichever machine looks easiest to park against a wall. Map the route from incoming lumber to storage, rough cutting, milling, assembly, finishing, and cleanup. A straightforward path limits backtracking and keeps long stock out of busy work zones. This matters because each extra crossing makes users wait, carry materials through someone else’s task, or set a project down in an unsuitable spot. The goal is not to make every project follow one rigid route, but to make the common route clear and identify where different jobs might conflict.
For example, say two people are building cabinets while a third repairs a chair. If lumber storage sits beside the table saw, the jointer and planer sit nearby, and assembly space follows downstream, cabinet parts can move through the shop without crossing the chair repair bench. Put a sanding or finishing area near ventilation and away from milling dust where your shop conditions allow. That arrangement trades some proximity between work areas for cleaner finishing and fewer interruptions. In a very small shop, separate rooms may be impossible, so schedule dusty milling and finish work at different times and clean between them.
Draw the space to scale and mark doors, windows, posts, outlets, and fixed equipment. Then sketch each task with a rough footprint for the tool, the operator, and the material. A table saw needs room for the board in front of and behind the blade, while a workbench needs room for a person to clamp and move around a project. Check the machine manual for required clearances and operating guidance; your drawing is a planning aid, not a replacement for those specifications. Include the routes people actually take to reach storage, switches, and exits, since a layout can look open on paper while creating awkward crossings once a board or project is in place.
Think of the workflow as a stream: every crossing is a rock that can slow it down. A delivery route that passes through the table-saw feed zone, for instance, creates a conflict even if the floor looks spacious at rest. For a small garage, rolling a bench out of the way may help, but keep its parked position away from exits and machine clearances. Mobility saves floor space only when moving and locking the bench is practical; if users must repeatedly shift a heavy station, they may leave it in the wrong place. Mark a reliable parking spot and make the setup easy to restore.
woodworking shop layout planning guide
As an affiliate, we earn on qualifying purchases.
As an affiliate, we earn on qualifying purchases.
Give every machine room for the whole cut
A safe machine zone includes room for the operator, workpiece, and offcuts, not just the machine’s footprint. Use each manufacturer’s manual and applicable local requirements to establish clearances and safe operating procedures. There is no single aisle width or universal floor plan that makes every machine safe in every shop. The practical implication is that machine zones change with the work: a saw that handles short parts comfortably may need a much larger clear area for sheet goods. Plan for the longest and widest stock the shop expects to handle, and decide how users will confirm that the area is clear before a cut.
Consider a shared table saw. One user may rip short cabinet parts; another may break down a full sheet or feed an eight-foot board. The second task needs a longer feed and outfeed path, and nearby traffic must stay clear while the cut is underway. If you cannot keep those paths open at the saw’s normal location, plan a safe way to reposition the work or the machine and verify the setup before cutting. Moving a machine can solve a clearance problem but may introduce new ones, such as a cord or dust hose crossing an aisle. A setup is workable only when those connections and the operator’s route remain safe too.
Mark machine operating areas on the floor with durable tape or another visible system, and keep high-traffic routes outside them. A person walking behind someone at a jointer can distract the operator or collide with a board. Leave space to reach the power switch and emergency stop without crossing a hazardous area, and keep first-aid supplies, fire extinguishers, and suitable personal protective equipment easy to find. Markings help users see the intended boundary, but they cannot stop a long board or a cart from extending into it; users still need to check the full working area before starting.
Clear exits and aisles stay clear even when a project runs long. If a long glue-up occupies the central floor, that is a sign to use a designated staging spot or adjust the schedule. Never treat a parked cart, clamp rack, or sheet of plywood as harmless if it blocks an exit or forces someone into a machine’s operating space. This can mean limiting the size of a project that stays assembled in the shop or reserving a staging area in advance. That constraint may feel inconvenient, but predictable access protects everyone and prevents one person’s work from becoming another person’s hazard.
dust collection system for woodworking shop
As an affiliate, we earn on qualifying purchases.
As an affiliate, we earn on qualifying purchases.
Keep shared tools and projects easy to find
Shared tools create fewer arguments when every item has a labeled home and a return routine. Put frequently used measuring tools, clamps, and hand tools near the benches where people use them; keep machine accessories close to their machines. Labels help a new member return a featherboard or wrench without asking three people where it belongs. Consistent locations also make missing or damaged items easier to notice. The tradeoff is that storage near a tool can crowd the work area, so place supplies where they are reachable without narrowing an aisle or putting hands near moving parts.
For example, if several users share a router table, store its insert rings, wrenches, and fence accessories in one labeled drawer beside the station. A simple check-in board can show who has a specialty bit set or whether a tool needs repair. When a tool is damaged, users should tag it and report the issue promptly instead of putting it back where the next person may assume it is ready. This small handoff record helps prevent repeat troubleshooting and unsafe assumptions, especially when users do not overlap in their schedules.
Personal projects need their own boundary too. A marked shelf, rolling cart, or numbered project bay tells everyone which materials belong together and whether a glue-up is still active. Without that space, one user’s cabinet doors can slowly spread across the only assembly bench. Set a limit on how much room an in-progress project can occupy and how long it can stay there without a check-in. A strict limit may require breaking a project into smaller stages, but that is often less disruptive than letting one job block shared equipment indefinitely.
For scarce equipment, use a calendar, whiteboard, or shared digital booking tool with realistic time blocks. A reservation should name the tool, the expected time, and any setup that affects the next user. If somebody needs a thickness planer for an hour, a posted booking prevents another user from setting up a competing job at the same time. Make the rules visible at the tool, not buried in a chat thread. Leave a little transition time where setup or cleanup takes effort; tightly packed bookings can look efficient while making delays inevitable.
As an affiliate, we earn on qualifying purchases.
Make a small shop adapt without creating hazards
A small shared shop can serve several people if you protect a few fixed safety zones and let lower-risk work areas flex around them. Mobile benches, folding assembly surfaces, and modular storage can free floor space between projects. Keep heavy machines stable, and make sure any movable station locks in place before someone applies force or runs a tool. Flexibility has a cost: every moved station needs a known home and a repeatable way to secure it, or the space saved on one task becomes setup time and confusion on the next.
Imagine a one-car garage where one user is milling narrow boards and another needs room for a wide panel glue-up. A mobile assembly table can roll into a marked staging area after milling, while a wall-mounted clamp rack keeps clamps off the floor. That arrangement only helps if the table does not block the exit, dust hose, or the required feed path when it is parked. If repositioning the table takes too long, users may skip the move; in that case, a smaller folding surface or scheduled work windows may be more reliable than a large mobile bench.
Adaptability also means designing for people who may have different heights, strengths, mobility needs, and experience. Put common supplies within reachable storage, provide a stable place to set down heavy stock, and consider an adjustable-height surface where the work supports it. Keep controls and emergency equipment easy for all authorized users to reach. A clear route matters for someone carrying lumber and for someone using a mobility aid. These choices can use valuable wall or floor space, so prioritize the equipment and supplies people need most often and avoid storing rarely used items in the easiest-to-reach areas.
Use the table below as a planning prompt, not a substitute for your equipment manuals or local safety requirements. A layout for multiple users should make flexible areas obvious while keeping machine zones predictable. If a rolling cart regularly ends up in a cutting path, change its home or the workflow instead of relying on everyone to remember to move it. Repeated workarounds show that the arrangement is asking too much of users; changing the storage location may give up convenience at one station while making the whole shop more dependable.
| Shop area | Useful flexible choice | Boundary to protect |
|---|---|---|
| Assembly | Mobile bench or folding surface | Keep exits and machine feed paths open |
| Hand tools | Modular labeled drawers | Return tools to the assigned location |
| Project staging | Numbered carts or marked bays | Keep active work within its assigned footprint |
As an affiliate, we earn on qualifying purchases.
Plan dust, power, light, and cleanup as one system
Dust collection and ventilation should match the processes and materials in your shop, and the layout should leave room for the equipment and service access they require. Place dust-producing machines with hose runs and duct paths in mind, then confirm that the collector suits the tools and connections in use. A tidy floor plan cannot compensate for inadequate dust control. Long or awkward duct routes can make a system harder to maintain and less convenient to connect, so machine placement and collection design need to be considered together.
For instance, a table saw and planer may run near one another, but simultaneous use can change the demand on a shared collector. Decide whether the system is intended for one machine at a time or concurrent use, and follow equipment guidance when sizing or operating it. Keep filters and collection bins accessible for maintenance; a collector tucked behind a stack of offcuts will be harder to empty and easier to neglect. If the shop depends on one machine at a time, make that limit visible so users do not assume that opening a second gate will preserve effective collection.
Lighting should let each user see blade lines, layout marks, and finish defects without casting a shadow across the work. Add task lighting at benches when general ceiling lights leave a dim patch. Plan electrical access with the machines and cords in mind, keeping cables out of walkways. Electrical installation or changes belong with a licensed professional; power must be off before any authorized work, and local code and permit requirements still apply. Good lighting and accessible power reduce awkward workarounds, though extra fixtures and outlets also need to be placed so they do not create glare, snag points, or new obstructions.
Make cleanup part of the route through the shop. Put scrap bins and waste sorting near the work that creates the waste, without narrowing aisles or blocking access. A five-minute cleanup at the end of each booked session can keep sawdust from migrating to finishing work and leave the next person a clear bench. Include suitable PPE and clear instructions for noisy, dusty, or hot processes. The exact routine depends on what was made and which machines ran; a quick sweep may clear offcuts but does not replace the maintenance or dust-control steps required by the equipment and materials.
Agree on simple rules that keep projects moving
A shared shop needs written agreements for training, booking, cleanup, labeling, and maintenance because people cannot infer one another’s habits from the floor plan. Keep the rules short, specific, and posted where they apply. For example, a note beside the planer can say who may use it, where to record a damaged knife, and how to leave the station for the next user. Specific rules reduce guesswork at the moment of use, when an unclear expectation can lead to pressure to rush or a tool being returned in an unsafe state.
Training rules matter especially around machines with serious hazards. A booking does not equal permission to operate equipment: users should follow the shop’s training process and the machine manual. Make the distinction plain. Someone who has not been cleared to use a machine should be able to find the right person or next step without feeling pressured by a queue. This can mean a wait for qualified help, but that delay is a predictable part of sharing equipment safely and should be reflected in scheduling.
Set a handoff routine for shared equipment. One user may finish a cut, clear the machine according to its instructions, return accessories, and note a fault before the next reservation begins. That routine prevents the next person from discovering a missing guard or clogged connection mid-project. A visible status tag can communicate whether equipment is ready, reserved, or out of service. Keep the tag process simple enough that users will use it; a complicated reporting system can leave important status information unrecorded.
Rules should support people with different schedules and project needs. If a user needs a long block for a cabinet run, booking limits can preserve access for others while still allowing planned work. Agree on how long personal materials may stay in shared areas and who may move them. In a small shop, a marked project shelf and a weekly review can prevent forgotten boards from slowly claiming the assembly bench. Consistent limits may require a user to clear or relocate work before it is finished, so provide a clear check-in process for projects that need extra time rather than letting exceptions develop informally.
Review the layout after real work exposes the bottlenecks
The best shop layout is a working draft that improves as you observe how people use it. After the first few weeks, ask where users waited, crossed paths, searched for tools, or struggled to clear away a project. Repeated friction points are better evidence than a floor plan that looked neat on paper. They can reveal that a machine is misplaced, a storage rule is unclear, or a task takes more room than expected; the remedy depends on which cause is repeating.
For example, if three users keep piling boards beside the planer, the issue may be missing staging space rather than careless behavior. If people leave clamps on the assembly bench, the clamp rack may be too far away or poorly labeled. If a cleanup routine repeatedly leaves dust in the finishing area, change the cleanup order or the location of collection and waste stations. Each pattern points to a different adjustment, so observe when and where the problem occurs before moving equipment that may be serving another useful purpose.
Keep a short log of near misses, blocked routes, maintenance access problems, and equipment conflicts. Review it with the users who work in the shop, then make one change at a time where possible. This makes it easier to see whether moving a cart or changing a reservation window actually helped. A quick sketch with revised machine and storage locations can preserve what you learn. If several changes are made together, the shop may improve, but it becomes harder to tell which one solved the bottleneck and which created a new inconvenience.
Revisit the plan when your tools, users, or typical projects change. A new bandsaw may need a different stock path; a new member may need different storage access; a large project may temporarily require a dedicated assembly area. Leave enough flexibility for those changes while keeping the essential rules intact: follow manuals and local requirements, keep exits clear, and give every shared item a clear place. A layout that works today is a useful baseline, not a promise that future work will fit without adjustment.
Frequently Asked Questions
How should I arrange machines for an efficient shared shop?
Arrange machines around the flow from storage to rough cutting, milling, assembly, finishing, and cleanup. Keep related tools near each other, and account for the full length of the stock each machine handles. Check the machine manual and applicable local requirements for clearances and operating procedures.
How wide should walkways be in a woodworking shop?
There is no universal aisle width that suits every shop and task. Keep exits and routes clear, and make sure people carrying materials do not pass through machine operating zones. Check local requirements and equipment manuals, then test the planned route with the longest stock you expect to handle.
Where should I store personal projects in a shared shop?
Give active projects a marked shelf, cart, or numbered bay with a defined footprint. Agree on how long materials can remain there and how users signal that a glue-up or assembly is still active. This keeps someone else’s cabinet parts from taking over the shared bench.
How can we prevent conflicts over popular tools?
Use a visible calendar or booking board for scarce equipment, with realistic time blocks and a place to note tool status. Set clear training requirements and a handoff routine for accessories, cleanup, and damage reports. Reservations help with scheduling, but they do not replace required training or safe operating procedures.
How often should we review a shared shop layout?
Review it after the shop has seen real use, and again when tools, users, or typical projects change. Look for repeated waits, blocked routes, misplaced tools, near misses, and cleanup problems. If people repeatedly work around the same bottleneck, adjust the layout or the shared rules that created it.
Conclusion
Start with the path a board takes through your shop, then give every machine, person, and unfinished project room to use that path safely. Pair the layout with clear homes for shared tools and simple booking, training, and cleanup rules.
A shop that works well for several people does not need to be large or polished. It needs clear routes, honest boundaries, and enough order that the next person can hear the planer start without first hunting for its wrench.
Halloween Picks
halloween
As an affiliate, we earn on qualifying purchases.