TL;DR

Get business pricing on tools and workshop supplies
- Business-only prices and quantity discounts
- Tax-exempt purchasing
- Multiple users, one account, clear invoices
A good hand-tool workstation does two jobs: it keeps tools easy to find and gives you a safe, stable place to use them. Start by listing your actual tasks, set bench height for relaxed shoulders (higher for detail work, lower for heavy planing), secure the workpiece with a vise and bench dogs, and store frequently used tools within arm’s reach while heavy items go low and sharp edges get protected. There is no universal ideal height or layout — body size and task type decide it.
I spent two years working on a bench that was three inches too tall. Didn’t think much of it until the day I planed a 6-foot oak board and my shoulders were burning by the second pass. That’s the thing about a bad workstation: the cost is invisible, paid out in small aches and wasted minutes every single time you work.
A good hand-tool workstation does exactly two jobs. It keeps tools easy to find, and it provides a stable, safe place to use them. Everything else — the French cleats, the shadow boards, the pretty lumber — is decoration until those two things are true.
In this guide, I’ll walk you through how to design a station around the work you actually do: bench height, surface stability, storage placement, workholding, and layout safety. I’ve made most of the mistakes already, so you don’t have to.
Design around tasks, not tools: list your actual work first, then place the 20% of tools you use constantly inside arm’s reach.
There is no universal bench height — test mocked-up heights with real planing and paring sessions before committing (most land between 33 and 38 inches).
Combine storage types: wall racks with shadow outlines for visibility, drawers for small precision tools, low cabinets for heavy items, and sheaths or slots fo…
A sturdy bench is useless without workholding — budget for a face vise, dogs, and holdfasts, and leave clear surface to actually work.
Leave clearance for your largest workpiece (3+ feet on the working side), add dedicated LED task lighting, and keep cords routed away from cutting paths.
Designing a Workstation for Hand Tool Storage and Use
A good hand-tool workstation does two jobs: it keeps tools easy to find, and it provides a stable, safe place to use them. Everything else — the French cleats, the shadow boards, the pretty lumber — is decoration until those two things are true.
“I spent two years on a bench that was three inches too tall. My shoulders were burning by the second pass on an oak board.”
— The cost of a bad station is invisible, paid in daily achesStart With the Work, Not the Tools
The question isn’t “where do my tools go?” — it’s “where does each task happen, and what does that task need within reach?” List every task you’ll perform at the bench and every tool it requires. Not the tools you own — the tasks you do. Then rank tools by frequency: the 20% you use constantly goes inside the golden zone, reachable without leaning or twisting.
Within arm’s reach
Marking knife, tape, two chisels, mallet — on a wall rack or in a top drawer.
Wall-mounted, visible
Specialty planes, dovetail saw — one step away, never hidden in a drawer.
Labeled drawers
Scraper set, moulding planes — in bins away from the bench.
Separate station
Stones and honing guides near the window — stone slurry and wood shavings don’t mix.
How High Should Your Bench Be?
There is no single ideal bench height. The right height lets you work with relaxed shoulders and a reasonably straight back — fine detail work benefits from a higher surface; heavy planing and pounding are easier lower. Most people land between 33 and 38 inches.
Mock it up. Stack plywood scraps on sawhorses or use an adjustable stand to test candidate heights.
Do real work. 30–60 minutes per height: pare dovetails, plane a board, saw a tenon.
Note complaints. Where do your shoulders, back, and wrists protest? Your body is the measuring tool.
Commit late, build low. A low bench can be raised later with a platform base; cutting one down is far uglier.
“When in doubt, build low and shim up.”
Wall Racks vs. Drawers vs. Tool Trays
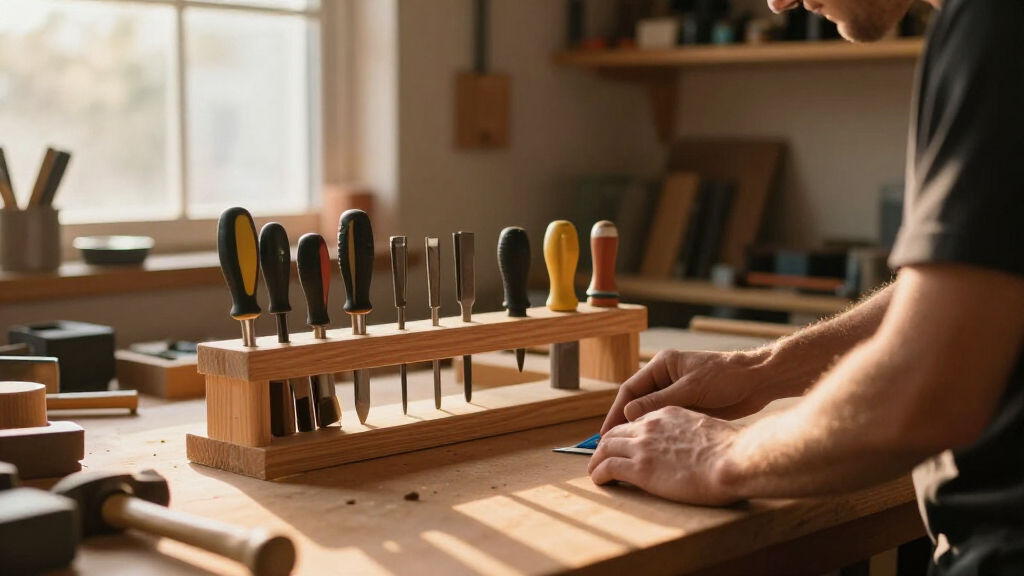
The best arrangement mixes systems, because each excels at a different job. Wall racks make tools visible and fast to grab, drawers protect precision items from dust, and a tool tray holds the four things in play right now. The placement rule: light and frequent goes high and close; heavy goes low and secure.
| Storage Type | Best For | Watch Out For | Zone |
|---|---|---|---|
| Wall rack / shadow board | Frequency-used hand tools; anything you want visible at a glance | Dust exposure; tools go missing silently without shadow outlines | High & close |
| Drawers | Chisels, small layout tools, measuring gear, fasteners | Out of sight = forgotten; costs more to build | Mid level |
| Tool tray on benchtop | The 3–5 tools in active use during a session | Collects shavings and dust; sharp edges near your hands | Benchtop |
| Shelves above bench | Reference books, boxes, finishing supplies | Never put heavy items high where they could fall | Upper |
| Cabinet below | Heavy tools, vises, clamps, power tools | Takes knee space; plan door swing carefully | Low & secure |
Why shadow boards matter: when every tool has a painted outline, a missing tool is instantly visible at the end of the session — exactly when you want to find the marking knife you left under a board, not next week when you step on it. Sharp tools need sheaths, dedicated slots, or fitted drawer dividers.
A Sturdy Bench Is Useless Without It
A bench can be a 300-pound maple monument and still be useless if your workpiece slides around while you work on it. Workholding turns a heavy table into a workstation — secure restraint lets you plane, saw, and pare with controlled force instead of chasing the wood across the shop.
Face vise
Front-left corner — holds boards on edge for sawing and edge-planing.
Tail vise + bench dogs
Clamps work flat against the top for planing and surface work.
Holdfasts
Dropped into ¾” dog holes — secures anything in between.
That trio covers 90% of hand-tool workholding — but a vise eats surface. Budget for the hardware and still leave clear benchtop to actually work, plus 3+ feet of clearance on your working side for long stock.
The Checklist Before You Build
Design around tasks, not tools. List your actual work first, then place the 20% of tools you use constantly inside arm’s reach.
Test bench height with real work. Mock up candidate heights and plane and pare at each before committing — most land between 33 and 38 inches.
Combine storage types. Wall racks with shadow outlines, drawers for precision tools, low cabinets for heavy items, sheaths or slots for sharp edges.
Budget for workholding. Face vise, dogs, and holdfasts — plus enough clear surface to actually use them.
Keep the layout safe. 3+ feet of clearance for large workpieces, dedicated LED task lighting, cords routed away from cutting paths.
Plan for change. Modular racks and movable trays make it easy to reorganize as tools and projects evolve.
Start With the Work, Not the Tools: The Task-First Method That Saves Rewrites
Designing a workstation for hand tools begins with one honest list: every task you’ll perform at the bench, and every tool each task requires. Not the tools you own — the tasks you do. That distinction is the difference between a station that works and a museum wall of chisels you never touch.
Here’s what that looked like in my garage. My list had four clusters: chop-and-parrel joinery (chisels, mallet, marking gauge), sawing (handsaws, bench hooks), planing (jack and smoother, square), and sharpening (stones, honing guide). Immediately I saw that sharpening didn’t belong at the bench at all — it belongs on a separate shelf near the window, because stone slurry and wood shavings don’t mix.
Then rank your tools by frequency. The 20% you use 80% of the time goes inside the golden zone — everything reachable without leaning forward or twisting. Occasional and specialized tools go to drawers, upper shelves, or another station entirely. Most people get this backwards and build storage for their prettiest tools, not their busiest ones.
- Daily drivers (marking knife, tape, two chisels, mallet): within arm’s reach, on a wall rack or in a top drawer
- Weekly tools (specialty planes, dovetail saw): wall-mounted, visible, one step away
- Seasonal tools (scraper set, moulding planes): labeled drawers or bins away from the bench
- Sharpening and setup gear: separate station, so grit and shavings never share a surface
The question isn’t “where do my tools go?” — it’s “where does each task happen, and what does that task need within reach?”
As an affiliate, we earn on qualifying purchases.
How High Should Your Bench Be? A Number That Fits You, Not the Catalog
There is no single ideal bench height. The right height lets you work with relaxed shoulders and a reasonably straight back, and that depends on your body and the work: fine detail work benefits from a higher surface, heavy planing and pounding are easier lower. Most people land between 33 and 38 inches, but buying that number from a book instead of measuring yourself is how I ended up with the too-tall bench.
Here’s the test that actually works. Stack plywood scraps on your sawhorses until the pile feels right, then do real work at that height for an hour — pare some dovetails, plane a board, saw a tenon. For planing, you want to put your weight over the plane; if the bench sits too high, you’re pushing with your arms and your shoulders will tell you by Friday. For detail work, a surface near wrist height when standing keeps your back from hunching.
According to Werkbericht’s workshop guides, adjustable-height surfaces and even sturdy stands under a benchtop can accommodate different users and tasks — worth considering if two people share the shop or you mix heavy and fine work. My own compromise: 34-1/2 inches, a height that splits the difference between paring and planing for my 5’10” frame.
- Stack scraps or use an adjustable stand to mock up candidate heights.
- Do 30–60 minutes of your most common tasks at each height.
- Note where your shoulders, back, and wrists complain.
- Commit to the height only after you’ve planed and pared at it for real.
One more thing: a lower bench can be raised later with a platform base. Cutting one down is far uglier. When in doubt, build low and shim up.
adjustable woodworking bench with vise
As an affiliate, we earn on qualifying purchases.
As an affiliate, we earn on qualifying purchases.
Wall Racks vs. Drawers vs. Tool Trays: Which Storage Goes Where
The best storage arrangement mixes three systems, because each excels at a different job. Wall racks make tools visible and fast to grab, drawers protect small and precision items from dust, and a tool tray holds the four things in play right now. Most good workstations use all three.
| Storage Type | Best For | Weakness |
|---|---|---|
| Wall rack / shadow board | Frequency-used hand tools; anything you want visible at a glance | Dust exposure; tools can go missing silently without shadow outlines |
| Drawers | Chisels, small layout tools, measuring gear, fasteners | Out of sight = forgotten; costs more to build |
| Tool tray on benchtop | The 3–5 tools in active use during a session | Collects shavings and dust; sharp edges near your hands |
| Shelves above bench | Reference books, boxes, finishing supplies | Never put heavy items high where they could fall |
| Cabinet below | Heavy tools, vises, clamps, power tools | Takes knee space; plan door swing carefully |
The placement rule is simple: light and frequent goes high and close, heavy goes low and secure. A 12-pound quick-release vise belongs on a shelf at knee height, not on a rack above your head. And sharp tools need sheaths, dedicated slots, or fitted drawer dividers — a loose chisel sliding around in a drawer will dull its edge and eventually find a finger.
Shadow boards deserve a specific mention. When every tool has a painted outline, a missing tool is instantly visible at the end of the session — which is exactly when you want to find the marking knife you left under a board, not next week when you step on it. It keeps tools easy to find and, just as important, makes absence obvious.
As an affiliate, we earn on qualifying purchases.
Why a Sturdy Bench Is Useless Without Workholding
A bench can be a 300-pound maple monument and still be useless if your workpiece slides around while you work on it. Workholding — vises, bench dogs, holdfasts, and clamps — is what turns a heavy table into a workstation. Secure restraint is what lets you plane, saw, and pare with controlled force instead of chasing the wood across the shop.
The classic setup for hand tool work: a face vise near the front-left corner for holding boards on edge, a tail vise or end vise with bench dogs for clamping work flat against the top, and a few holdfasts in 3/4-inch dog holes for anything in between. That trio covers 90% of hand-tool tasks in a small shop. Budget roughly $150–350 for a decent front vise; the budget versions work, they just rack more and need a bushing or two to stop slop.
I learned this lesson building a workbench before I owned a vise. First real project, I tried planing a board clamped between two bar clamps to the benchtop. Every stroke, the clamps shifted. Twenty minutes of frustration, then I stopped, ordered a vise, and did something else for a week. That pause cost less than every future project fighting bad workholding would have.
- Face vise: holds stock on edge for sawing tenons, planing edges
- End vise + dogs: pins boards flat for surface planing
- Holdfasts: cheap, fast, hold anything over a dog hole
- Bench hooks and shooting board: no clamping needed, just pressure
Leave enough clear surface around your workholding, too. A bench buried under storage has nowhere to actually work — storage should leave room to use tools, not maximize the number of tools on display.
As an affiliate, we earn on qualifying purchases.
Stability and Surface Durability: What Makes a Bench Stop Rocking
A stable workstation starts with three things: a heavy or well-braced base, sound joinery, and a top securely fastened to that base. If your bench rocks on an uneven garage floor — and garage floors are never flat — everything you do at it suffers. A shim under one leg fixes the floor; a flimsy base can’t be fixed by shims.
Weight is your friend. My first bench was built from 2x4s and plywood, maybe 60 pounds total, and it walked across the floor every time I sawed. My current bench has a base of laminated spruce with stretchers bolted through, and the whole thing weighs in around 200 pounds. The difference in sawing and planing is night and day — the bench absorbs the force instead of translating it into movement.
For the top itself, you have options. Hard maple is the gold standard but costs accordingly. A laminated butcher-block top, or even multiple layers of MDF and plywood glued together, gives you a flat, dead surface at a fraction of the price. Protect the main surface with sacrificial boards or replaceable inserts — I keep a 1/4-inch hardboard overlay for glue-ups and messy work, and it has saved my benchtop from every glue drip since.
- Bolt the top to the base with washers in slotted holes so the top can move with humidity.
- Level the bench, then shim the feet; add adjustable levelers if your floor is truly bad.
- Keep a sacrificial hardboard sheet for glue, finishes, and drilling.
- Check flatness yearly — a winding pair of sticks catches twist before your joinery does.
And don’t forget the floor around the bench: rubber anti-fatigue mats dampen vibration and keep long winter sessions kind to your knees and back.
Layout, Lighting, and Safety: The Details That Prevent the Trip to the ER
A safe workstation layout comes down to clearance and visibility. You need enough room to stand comfortably, open every drawer and cabinet, and handle the largest workpiece you expect to use — not the average one. For most garage shops that means at least 3 feet of clear space on the working side of the bench and a path behind you for long stock.
Lighting matters more than people admit. Overhead garage lights cast shadows exactly where you work — under your own arms. Add LED task lighting on a flexible arm or a bar above the bench, around 800–1100 lumens, positioned so it rakes across the surface and highlights layout lines. Good lighting improves visibility, but it does not substitute for safe handling and protective equipment. Safety glasses stay on, full stop.
Then think about circulation. Route cords and hose away from cutting areas, never across the walking path in front of the bench. Keep frequently used items accessible without reaching across sharp tools — that block plane sitting edge-up by your elbow is a laceration waiting for a deadline. And if your station shares space with power tools, plan your dust collection so hand-tool shavings don’t get blown onto your layout work.
Every tool has a home, every tool goes home at the end of the session. A clean bench is a safe bench — and a cleared surface is a visible one, where the missing chisel can’t hide.
Finally, build in room for change. Modular racks, movable trays, and French cleat wall systems let you reorganize as your tools and projects evolve. The workstation you need in five years will not be the one you need today.
Frequently Asked Questions
How high should a hand-tool workbench be?
There’s no single correct height — it depends on your body and the work. Most benches land between 33 and 38 inches: detail work is easier higher, heavy planing and pounding easier lower. Mock up candidate heights with stacked scraps and test them with your actual tasks for at least 30 minutes each before committing. When in doubt, build slightly low; you can always add a platform, but cutting down a tall bench is painful.
Are wall racks or drawers better for hand tool storage?
Neither wins alone — most good workstations use both. Wall racks (especially with shadow outlines) make frequently used tools visible and quick to grab, and missing tools obvious at a glance. Drawers protect smaller precision tools like chisels and marking gauges from dust and dulling. Add a tool tray for the 3–5 tools in active use during a session.
Do I need a vise on my workstation?
If your tasks involve sawing, planing, filing, or assembly — yes, secure workholding is one of the highest-value upgrades you can make. A face vise plus bench dogs with an end vise covers roughly 90% of hand-tool work in a small shop. Expect to spend $150–350 on a solid front vise; budget versions work but may rack under load.
What’s the best way to store sharp tools safely?
Protect the edge and prevent movement: use edge guards or sheaths, dedicated slots on a wall rack, or divided drawers sized so tools can’t slide into each other. Never store chisels or knives loose in a drawer — a rolling chisel dulls its edge and becomes a hazard the moment you reach in blind.
How can I make a hand-tool workstation work in a small space?
Use a compact or foldaway bench, go vertical with wall-mounted storage and French cleats, and choose mobile cabinets you can roll away between projects. Keep the layout resettable — everything has a home and returns there after each session — so a 6-foot strip of garage wall can function as a full workstation instead of a cluttered shelf.
How much clearance should I leave around my workstation?
Enough to stand comfortably, open all storage fully, and handle the largest workpiece you realistically expect to use — for most shops that’s at least 3 feet of clear space on the working side of the bench, plus a clear path behind you for long stock. Clearances sized for your average project will betray you the first time you handle an 8-foot board.
Conclusion
If you remember one thing: start with the work, and let everything else follow. Bench height follows your body and your tasks. Storage placement follows frequency. Workholding follows what you build. When a workstation is designed from the task backward, the tools you need seem to appear exactly where your hand reaches — because that’s literally where you put them.
Your homework is cheap: a stack of plywood scraps, a tape measure, and an hour of real work at a mocked-up height. Do that before you cut a single stick of bench lumber. Your shoulders, your projects, and the version of you working five years from now will all thank you.
Fall Picks
fall essentials
As an affiliate, we earn on qualifying purchases.