TL;DR

Get business pricing on tools and workshop supplies
- Business-only prices and quantity discounts
- Tax-exempt purchasing
- Multiple users, one account, clear invoices
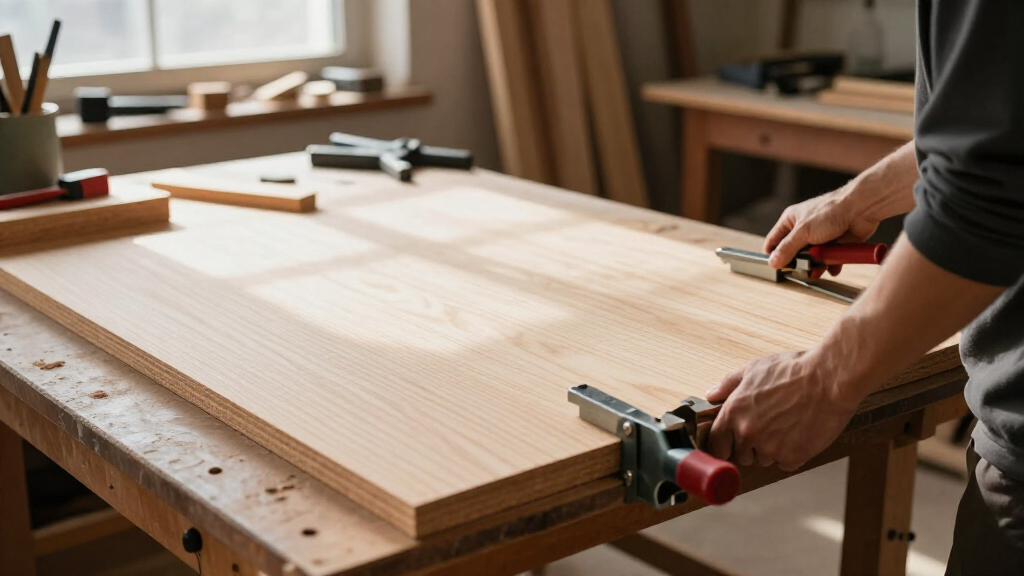
The best clamps for large panels are matched pairs of parallel-jaw clamps or pipe clamps, spaced evenly and alternated above and below the panel to apply even pressure across the panel without bowing it. Stiffness and setup technique matter more than raw clamping force or clamp price — a modest set of stiff clamps with cauls will outperform a pile of long, flexible ones.
Glue-up day is where most panel projects go wrong. You spent hours jointing edges and getting a dead-flat panel in the dry fit — then you crank four clamps down, and the finished panel comes off the rack with a rock in the middle you can see from across the shop. The clamps did it. Not the glue, not the wood. The clamps.
Here’s the thing nobody tells you when you’re starting out: for large panels, clamp stiffness and setup matter far more than clamping force or how much you spent. A $30 pipe clamp setup with good technique will give you a flatter panel than $600 of the wrong clamps used badly.
In this guide, you’ll learn which clamp types actually work for wide panels and sheets, how many you really need, how to space them, and the caul tricks that keep boards coplanar. I’ve glued up panels from 18″ walnut drawer fronts to a 52″ dining tabletop in a two-car garage — everything here comes from doing it, not reading catalogs.
Matched pairs of parallel-jaw or 3/4" pipe clamps, alternated above and below the panel, give the flattest large-panel glue-ups.
Clamp stiffness beats clamping force — over-tightening starves joints, bows boards, and dents softer woods.
Space joint-closing clamp pairs roughly every 8–12 inches along the panel length; dry-fit the full clamp arrangement before glue.
Homemade crowned cauls across the panel face keep boards coplanar for the cost of hardwood offcuts and a strip of tape.
Check opening capacity, throat depth, and bar stiffness — in that order — before buying any clamp for wide work.
Best Clamps for Clamping Large Panels and Sheets
Matched pairs of parallel-jaw or pipe clamps, spaced evenly and alternated above and below the panel, apply even pressure without bowing. Stiffness and setup technique beat raw clamping force — a modest set of stiff clamps with cauls outperforms a pile of long, flexible ones.
A $30 pipe clamp setup with good technique gives a flatter panel than $600 of the wrong clamps used badly.
Key Insight — From the Shop FloorFive Takeaways for Flat Panels
Alternating clamps above and below the panel balances forces and directly reduces bowing — a free technique that outperforms simply buying more or longer clamps.
Matched pairs of parallel-jaw or 3/4″ pipe clamps, alternated above and below, give the flattest glue-ups.
Stiffness beats force. Over-tightening starves joints, bows boards, and dents softer woods.
Space pairs every 8–12″ along the panel; dry-fit the full clamp arrangement before glue.
Homemade crowned cauls keep boards coplanar for the cost of offcuts and a strip of tape.
Check capacity, throat depth, bar stiffness — in that order — before buying any clamp.
Which Clamps Work for Wide Panels — and Which Don’t
Parallel-jaw clamps stay perpendicular under load, keeping edges aligned and spreading pressure across a broad face. Pipe clamps reach long capacities economically — a 60″ panel just needs a longer pipe. Bar and F-style clamps play only a supporting role: flexing bars concentrate pressure at the ends while the middle joints — the hardest to fix — see the least.
Parallel-Jaw Clamps
Wide jaws stay perpendicular to the bar under load. Edges align without fiddling; pressure spreads across a face instead of a thin line. Ideal for tabletops, doors, and wide panels.
Pipe Clamps (3/4″ Black Pipe)
The economical route to long capacity — swap a longer pipe, not a longer clamp. Manage pipe flex over long spans and protect wood from pipe stains with pads.
Bar & F-Style Clamps
Bars flex over long spans; narrow jaws press in a thin line. On a 40″ tabletop, the middle sees less pressure than the ends — exactly backwards. Fine for jigs and small parts.
| Clamp Type | Best For | Watch Out For |
|---|---|---|
| Parallel-jaw | Tabletops, cabinet doors, wide panels | Cost, weight; capacity limited by bar length |
| Pipe clamp | Long panels on a budget | Pipe flex over long spans; can stain wood unprotected |
| Bar clamp (steel) | Mid-sized panels, assemblies | Check bar stiffness and throat depth |
| F-style | Supplementary pressure, jigs, small parts | Too flexible as your only clamps on wide work |
| Panel / wide-jaw | Keeping faces coplanar, reaching across faces | Complement — don’t replace — joint-closing clamps |
Why Stiffness Beats Clamping Force
PVA glue bonds through a thin, continuous film. Excess pressure squeezes that film out entirely — a starved joint is weaker than a slightly loose one with full coverage. Meanwhile, a bar under tension bows: stiffness drops with the cube of length, so doubling the span makes it eight times more flexible.
The Silent Failure
A flexible clamp fails silently: the handle reads tight, the edges look closed — only the middle of the panel knows the truth, months later, when a hairline gap opens. The force you feel at the handle is not the force arriving at the joint.
Shorter Beats Longer
On a 48″ panel, three pairs of 24″-deep parallel clamps positioned correctly beat two 60″ clamps spanning the width — less flex, better pressure distribution, and easier to manage alone within the glue’s working window.
How Many Clamps — and How to Space Them
You need enough clamps to close every joint evenly along the panel’s length. For typical 3/4″ stock with good edge joints, that means a clamp pair roughly every 8 to 12 inches. Under-clamp and the middle of each joint never closes; over-clamp the ends to compensate and you’re back to starved, crushed joints.
Dry-Fit Everything
Assemble the panel and arrange all clamps before any glue touches wood.
Alternate & Space
Clamp pairs every 8–12″, alternated above and below to balance forces.
Add Cauls
Crowned cauls across the face keep boards coplanar; pad every contact point.
Tighten Gradually
Even, modest pressure. A continuous bead of squeeze-out signals a closed joint.
Clean Up
Remove squeeze-out at the right stage for your glue before it skins over.
The Buying Checklist — In Order
Opening Capacity
The opening must exceed the panel width or assembly thickness — no exceptions.
Throat Depth
The throat must reach the area where pressure is actually needed.
Bar Stiffness
Roll pipe on the store floor to check straightness — a crowned pipe presses a crown into your panel.
Quantity Over Length
A set of shorter, stiff clamps outperforms a few very long, flexible ones.
My first big glue-up was a 36″ ash tabletop using six cheap aluminum bar clamps. Everything looked tight at the edges. Two months later, a hairline gap opened at the center joints.
The bars had bowed; the joints in the middle never fully closed. Seasonal movement worked the gap wider — and a weak joint in the center of a tabletop is a flaw you’ll see every dinner for the next twenty years.
Rule of thumb from my shop: the clamp that closes the joints goes below; everything else assists.
Build Your Panel-Clamping Kit
Parallel-Jaw Clamps
Matched pairs for tabletops, doors, and wide panels. Broad, parallel faces align edges and spread pressure. Buy capacity that matches your widest realistic project.
3/4″ Pipe Clamp Setup
Clamp heads plus threaded black pipe cover any length for a fraction of the cost. Roll pipes for straightness at the store; pad them to prevent stains.
Technique + Cauls
Alternating clamps above and below, even spacing, and homemade crowned cauls from hardwood offcuts — the biggest flatness gains cost nothing at all.
Which Clamp Types Actually Work for Wide Panels (and Which Don’t)
The best clamps for clamping large panels are parallel-jaw clamps and pipe clamps used in matched pairs. Parallel-jaw clamps have wide jaws that stay perpendicular to the bar under load, and that geometry has two consequences that matter at panel scale: edges stay aligned without extra fiddling, and pressure spreads across a broad face instead of a thin line. Pipe clamps — a clamp head and tail sliding onto threaded black pipe — are the economical way to reach long capacities, since a 60″ panel just needs a longer pipe, not a longer clamp. The tradeoff is that pipe clamps give up some rigidity and convenience for that flexibility, and the pipe itself becomes a variable you have to manage.
Bar clamps and F-style clamps have their place, but it’s a supporting role, and it’s worth understanding why. Their bars flex more over long spans, and narrow jaws concentrate pressure in a thin line instead of a broad face. On a 40″ tabletop, a flexing bar means the middle of the panel sees less pressure than the ends — which is exactly backwards, because the middle joints are the ones furthest from any support and the hardest to fix after the fact. A weak joint near an end can often be patched, glued again, or hidden under a breadboard. A weak joint in the center of a tabletop is a flaw you’ll see every dinner for the next twenty years.
A quick story: my first big glue-up was a 36″ ash tabletop using six cheap aluminum bar clamps. Everything looked tight at the edges. Two months later, a hairline gap opened at the center joints. The bars had bowed; the joints in the middle never fully closed. By the time I noticed, seasonal movement had already worked the gap wider. That’s the insidious part of a flexible clamp: it fails silently. The clamp reads “tight” on your wrist, the edges look closed, and only the middle of the panel knows the truth — months later, when it’s too late.
| Clamp Type | Best For | Watch Out For |
|---|---|---|
| Parallel-jaw | Tabletops, cabinet doors, wide panels | Cost, weight; capacity limited by bar length |
| Pipe clamp | Long panels on a budget | Pipe flex over long spans; can stain wood unprotected |
| Bar clamp (steel) | Mid-sized panels, assemblies | Check bar stiffness and throat depth |
| F-style | Supplementary pressure, jigs, small parts | Too flexible as your only clamps on wide work |
| Panel/wide-jaw clamps | Keeping faces coplanar, reaching across faces | Complement — don’t replace — joint-closing clamps |
Rule of thumb from my shop: the clamp that closes the joints goes below; everything else assists. When a glue-up starts fighting itself, it’s usually because two clamps are trying to do different jobs at the same joint.
parallel jaw clamps for woodworking
As an affiliate, we earn on qualifying purchases.
As an affiliate, we earn on qualifying purchases.
Why Stiffness Beats Clamping Force Every Time
More clamping force is not better glue-up technique — it’s usually worse, and the reasons are chemical as much as mechanical. PVA glue works by forming a thin, continuous film between two mating surfaces. Excessive pressure squeezes that film out of the joint entirely — what woodworkers call a starved joint — and a starved joint is weaker than a slightly loose joint with full glue coverage, because the glue has nothing left to bond with. Over-tightening also bows thin boards and can dent softer woods like pine or alder, leaving witness marks you’ll sand at for an hour. Most wood glues need surprisingly modest, evenly distributed pressure, not brute force. The goal is joints that close fully along their entire length.
Here’s the physics that bites you on long panels: a clamp bar under tension bows. The longer and thinner the bar, the more it bows — stiffness drops with the cube of length, so doubling a bar’s span makes it eight times more flexible. As it bows, the pressure at the midpoint of the panel drops while pressure at the ends stays high. So your panel gets crushed at the joints near the clamps’ fixed heads and barely closed in the middle. The implication: the clamps that feel tightest are often doing the least useful work, because the force you feel at the handle is not the force arriving at the joint.
That’s why a set of shorter, stiffer clamps can outperform two massive long ones. On a 48″ panel, three pairs of 24″-deep parallel clamps positioned correctly will beat a pair of 60″ clamps spanning the whole width — less flex, better pressure distribution, and easier to manage alone, which matters more than it sounds: glue has a working window, and wrestling one heavy clamp into position three times costs you less time than repositioning six.
For pipe clamps, use 3/4″ black pipe instead of 1/2″ for spans over about 36″. The thicker wall and larger diameter flex dramatically less for a small weight penalty. And always check the pipe for straightness at the store — I’ve pulled pipes off the rack that had a visible crown before any load was applied. A crowned pipe presses a crown into your panel, which is a defect you introduced for the price of not spending thirty seconds rolling the pipe on the store floor.
As an affiliate, we earn on qualifying purchases.
How Many Clamps You Actually Need (and How to Space Them)
There’s no magic number, but here’s a practical answer: you need enough clamps to close every joint evenly along the panel’s length, which for typical 3/4″ stock with good edge joints means a clamp pair roughly every 8 to 12 inches along the panel. A 48″-long tabletop made of 5 boards needs 5 to 7 pairs of clamps closing the joints — not 2 or 3. Why that range? Each joint needs enough closure force to bring the mating surfaces into full contact, but the force from one clamp pair fades with distance as the wood itself flexes. Under-clamp, and the middle of each joint never closes; over-clamp the ends to compensate, and you’re back to starved, crushed joints at the clamps. Spacing is really about letting modest, even pressure do the work instead of heroic pressure at a few points.
Spacing depends on four things, and each pushes the number in a direction. Panel thickness: thin stock (under 1/2″) bows more between clamps, so tighten spacing. Joint quality: perfectly jointed edges need less force to close, so you can space wider — which is why the best clamp upgrade is sometimes a tune-up of your jointer. Clamp stiffness: flexier clamps need closer spacing to compensate. Glue open time: more clamps means a longer setup, so if your glue gives you ten minutes, budget clamps and helpers accordingly. Follow the manufacturer’s guidance for your specific clamps, and always — always — test with a dry fit.
- Dry-fit everything. Arrange every clamp, check reach and jaw contact, and confirm the panel sits flat before glue exists anywhere near it. This is also your rehearsal: glue-up should be a repeat of a procedure you’ve already done, not a first attempt with a countdown running.
- Place clamp pairs at regular intervals along the panel length — every 8–12″ for typical panels.
- Alternate clamps above and below the panel. This balances forces and reduces bowing — clamping from one side only applies a net bending moment, and alternating cancels it out.
- Add cauls across the panel face where boards need to stay coplanar.
- Tighten gradually and evenly, working from the center outward, checking joint closure as you go.
On my 52″ tabletop glue-up, I dry-fit three times. The first arrangement had clamps fighting each other — one board lifted 1/16″ off the rails. Rearranging cost me 20 minutes. Discovering that after glue would have cost me the tabletop — or at minimum a weekend of flattening that a two-car garage with no wide sander was not equipped to deliver.
woodworking cauls for panel glue-up
As an affiliate, we earn on qualifying purchases.
As an affiliate, we earn on qualifying purchases.
The Caul Trick That Keeps Panels Flat Without More Clamps
Cauls are the cheapest flatness upgrade in your shop, and understanding why they work tells you where they fit. A caul is simply a stiff bar — hardwood, aluminum extrusion, or steel — clamped across the panel face to hold boards coplanar while the glue cures. Your joint-closing clamps press along one axis; cauls press along the perpendicular axis. Two boards can have perfectly closed, glued joints and still sit 1/32″ stepped from each other in height — the joint is strong but the surface isn’t flat, and that step is exactly the kind of flaw you feel with a hand passing over a finished tabletop. No amount of joint-closing pressure fixes it, because it isn’t a joint problem. Only pressure across the face fixes it, and that’s what a caul delivers.
Here’s how I make them: mill hardwood strips about 1-1/2″ thick and 2″ wide, then plane a slight convex crown — about 1/32″ — along the bottom face. The crown is the whole trick: a perfectly flat caul clamped only at its ends presses only at its ends. The crown flattens under clamping pressure and distributes force across the entire width, holding every board flush. Without it, you’ve built a very straight board that touches your panel in two places. Some woodworkers add packing tape to the caul’s face so glue doesn’t bond it to the panel permanently — a lesson you only need to learn once, and it involves a chisel and some choice words.
How many you need scales with the panel. On a panel without bowing issues, two or three cauls across a 48″ width, clamped with cheap F-style clamps, handle it — which is the other payoff of cauls: they let cheap, flexible F-clamps do a job they could never do alone, because a caul spanning multiple joints only needs firm downward pressure, not the stiffness required to close a joint. The caul borrows stiffness from its geometry and grain orientation; the F-clamp just supplies the squeeze.
One more protection tip: protect the work from the clamps. Pipe clamps in particular can react with moisture in glue and leave black iron stains on light woods like maple — the tannins in the wood interact with iron and water to form a dark discoloration that penetrates below the surface. A strip of wax paper or painter’s tape between pipe and panel is cheap insurance against a stain you’ll be sanding at for an hour, if it comes out at all.
clamping tools for large wood panels
As an affiliate, we earn on qualifying purchases.
As an affiliate, we earn on qualifying purchases.
How Tight Is Tight Enough — Reading Glue Squeeze-Out
Tighten only until the joints close evenly — no more. A practical visual check is a continuous, modest bead of squeezed-out glue along the joint line. That tells you the joint has closed and glue has been distributed. It doesn’t tell you exact pressure — it’s a sanity check, not a gauge — but it’s the feedback loop every woodworker actually uses at the bench, because the alternative (calculating PSI per joint mid-glue-up) isn’t happening with a clock running.
What you should never see: glue shooting out in ropes, wood fibers compressing visibly at the jaw pads, or the panel taking a bow as you tighten. Each symptom points to a different failure. Ropes of glue mean the joint is being starved — the adhesive you need inside the joint is now on the floor. Compressed fibers at the pads mean your clamps are denting the work, a permanent mark on the show surface. A bowing panel means your clamp forces are unbalanced or one-sided, and continuing to tighten will set that bow into the glue line permanently. Any of those means you’re over-clamping. Back off. A starved joint (too little glue left inside) is weaker than a slightly loose-fitting joint with full glue coverage — the loose joint at least has glue bridging the gap; the starved joint has two clean surfaces and nothing between them.
Work from the center of the panel outward, snugging each clamp a little at a time in rotation rather than fully tightening one clamp before touching the next. The reason is mechanical: tightening one clamp fully shifts the whole assembly toward it, walking the panel sideways off your layout lines. Incremental tightening in rotation lets each adjustment settle before the next, keeping the panel from wandering — a common cause of misaligned joints that applies even when your clamp setup is perfect.
Clean squeeze-out at the right stage for your glue. Most yellow PVA glues scrape cleanly with a sharp chisel or card scraper once they reach the rubbery stage — roughly 20 to 45 minutes depending on shop temperature. The timing matters because glue goes through phases: wet and smearable, then rubbery and peelable, then hard and chisel-worthy. Too early and you smear it into the pores, where it telegraphs through finish; too late and you’re chiseling hard yellow ridges that can dig into soft wood around them.
What to Check Before You Buy Any Clamp
Before spending money, verify three specs: capacity (maximum opening), throat depth, and bar stiffness — and understand what each one actually costs you when you get it wrong. Opening is the maximum distance between the jaws; if it doesn’t exceed your panel’s width, the clamp is simply unusable for that job, but the subtler mistake is buying to your current biggest panel with no margin. Add room for cauls, jigging, and the inevitable bigger project. Throat depth is the reach from the bar to the jaw face, and it’s the single most common buying mistake I see: a long clamp with a shallow throat still can’t put pressure where you need it on wide work, because the clamp can span the panel but can’t reach the joints — you’ve paid for capacity you can’t actually deliver to the glue line.
If you’re building a pipe clamp system, check thread type and pipe size compatibility before adding heads or extensions — pipe-clamp heads often fit only one pipe diameter. Buying 3/4″ heads for 1/2″ pipe is a frustrating Tuesday-night discovery, and it’s worth thinking about pipe clamps as a system rather than individual tools: standardizing on one pipe diameter means every head, tail, and extension works with every pipe you own, which compounds in value as your collection grows.
- Opening capacity: exceeds your widest planned panel plus room for cauls
- Throat depth: deep enough to reach the joints on wide panels
- Bar or pipe material: steel or thick-wall pipe for spans over 36″
- Jaw pads: removable, replaceable, non-marring
- Replacement parts and warranty: cheap clamps with no parts support are disposable
Recent clamp designs emphasize quick-release triggers, lighter materials, and better jaw pads. Those features genuinely speed up setup — and on a big glue-up with a fast glue, setup speed translates directly into more working time — but they don’t make a flexible bar stiff. Prioritize stiffness first, convenience second. And be honest about your tier: a home shop gluing up the occasional tabletop does not need twelve 60″ premium parallel clamps. Four quality mid-range parallels plus a pipe clamp set covers 95% of what a garage shop will ever glue, and the money saved buys the clamps you’ll actually use on every project — the mid-sized ones that live on the bench.
Frequently Asked Questions
What are the best clamps for large panels?
Parallel-jaw clamps are the go-to for accurate panel glue-ups because their wide, parallel faces keep edges aligned and spread pressure. Pipe clamps on 3/4″ black pipe are the economical alternative for long panels. The right choice depends on your panel length, required opening, bar stiffness, and budget.
How many clamps do I need for a large panel glue-up?
There’s no universal number. For typical 3/4″ stock with well-jointed edges, plan on a clamp pair every 8 to 12 inches along the panel’s length. A 48″ tabletop generally needs 5 to 7 pairs. Always verify with a dry fit — if any joint isn’t closing evenly, add clamps or cauls.
Should I alternate clamps above and below the panel?
Yes, usually. Alternating clamps above and below balances the clamping forces and reduces bowing across the panel. As you tighten, keep checking that the panel stays flat — if it starts to bow, back off and reassess your arrangement before the glue sets.
Are pipe clamps good for tabletops?
They can be, especially over long spans, provided the pipe is stiff enough — use 3/4″ pipe for spans over about 36″ — and the clamps are spaced evenly. Protect the wood from the pipe with wax paper or tape, since black pipe can stain light woods, and watch for flex on very long spans.
How do I stop boards from slipping when clamping a panel?
Dry-fit first, apply pressure gradually from the center outward, and alternate clamps above and below the panel. If boards still walk, add cauls across the face or use small alignment aids like biscuit joints or dowels to lock the boards mechanically while the glue cures.
Do I need parallel-jaw clamps for every glue-up?
No. Parallel clamps excel at panel alignment, but pipe and bar clamps produce excellent results with careful setup, cauls, and a sound dry fit. For a garage shop, a small set of quality parallel clamps plus a pipe clamp kit covers nearly every panel you’ll build.
Conclusion
If you remember one thing from this guide, make it this: technique and stiffness beat force and price on large glue-ups. Alternating your clamps above and below the panel costs nothing and does more for flatness than any upgrade you can buy. Add cauls, dry-fit everything, and tighten only until you see that modest, continuous glue bead.
Glue-up is the moment the whole project comes together — literally. Set your clamps up like you mean it, and the panel comes off the rack flatter than your jointer left it. Rush it, and you’ll be spending a weekend with a card scraper and regret.
Fall yard work Picks
leaf blowers
As an affiliate, we earn on qualifying purchases.